Banshee snatch without overloading!
Posted November 9th 2015
Associated movies
- BCM163 - Easy; Maw Banshee snatch without overloading! (5:47)
Discovery
Back in my article 'Maw Banshee snatch - faster!' I described how to speed up the overloading work for the classic Maw Banshee snatch trick, making things much less arduous. The overloading was so the Banshee would have no pilot inside of course, so you could board as it flew over. Well, now I've got a way of acquiring that same Banshee in normal play, with no overloading at all! So for anyone who still couldn't face doing the overloading work, your luck is finally in. If you were to use Easy so you can speed through the level, you could very well have the Banshee within a mere ten minutes if you use the 'fast retry' plan below - which typically would be best for speed and for first-timers, though it doesn't give a checkpoint afterwards.
But wait! In normal play the Banshee will have a pilot as usual, so how can you possibly snatch it? Well, if you throw a plasma grenade at the nose, it potentially passes through and tags the pilot. Surprisingly he'll then dismount, which is behaviour I've not seen from tagged pilots anywhere else in the game. That leaves the Banshee empty and you can then snatch it as normal, jumping up and mashing X to board (or if you've already got some height by standing on a hog, just mashing X). A rather amusing switcheroo! I call it a tag-snatch. The unusual bailing behaviour seems to be linked to the inactive state of the pilot during the scripted phase of the Banshee's flight; because once he activates a short way past the bridge, tagging him won't cause bailing any more.
I cottoned on to this tag-snatch possibility towards the end of my work on the aforementioned article. The Banshee was approaching and from my tracker I knew it was manned, so for fun I threw a plasma at it when it was close. Then by automatic reflex I unintentionally jumped up and mashed X, because that's what I'd been doing time after time with empty Banshees. And unexpectedly I found myself aboard. The Elite had popped out at the last moment. Afterwards the import dawned on me. I'd just snatched a Banshee which had been manned. And as such, it looked like overloading could potentially be dispensed with. However, I decided to leave a proper investigation until later.
Having now confirmed that the pilot tagging was not something hopelessly freaky, and that overloading is indeed not required, this means you can get the Banshee much faster - and there are other benefits too, such as the Banshee having problem-free firing. The only issue time-wise is that you may need multiple attempts at tagging the pilot, because even when your throw is well aimed, it's random whether the grenade passes through to him. However, hopefully it'll work within a handful of throws. You don't need any special throwing skill either; I've got advice for getting throws on target almost automatically.
Two ways of working
Once you're approaching the rendezvous area - armed with at least one plasma grenade of course - there are two ways of working, which I'll describe (they're also both demoed in BCM163). But let me also say, it's a very good idea to've saved the drive start checkpoint in case you end up wanting to restart from there for any reason. In particular, it could be worth doing the fast retry plan first, to get familiar with the throwing and snatching before using the standard plan. Also, you may like to have a pistol because the small reticle is helpful for precise throw aiming.
Standard plan
In this plan you end up with a checkpoint after the snatch. Obviously a very nice thing to have!
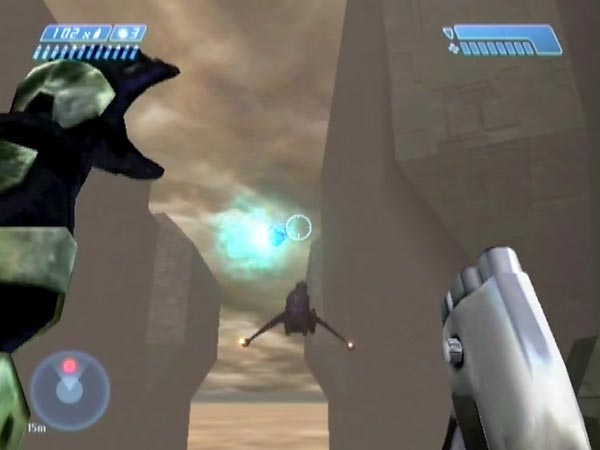
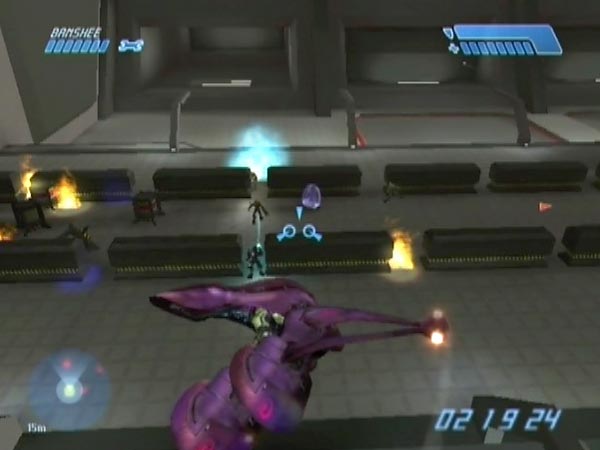
Just past the centre circle at the rendezvous, stand on the pale rim on the right, slightly past the middle, and face where Echo 419 comes from. The Banshees are initially flying scripted paths, and yours is the one on the right. You're standing where it'll go directly overhead. Your right side would be approximately level with the right-hand side of the central row of paving squares (there are five rows).
When it's getting near (heading slightly to your right), it banks to its right before levelling out for the bridge flyover. For your plasma throw I recommend that you aim like you see in the accompanying picture, and throw just as the Banshee has levelled, or thereabouts (slightly earlier or later is fine). That should result in a good throw heading for the nose, which is what you want.
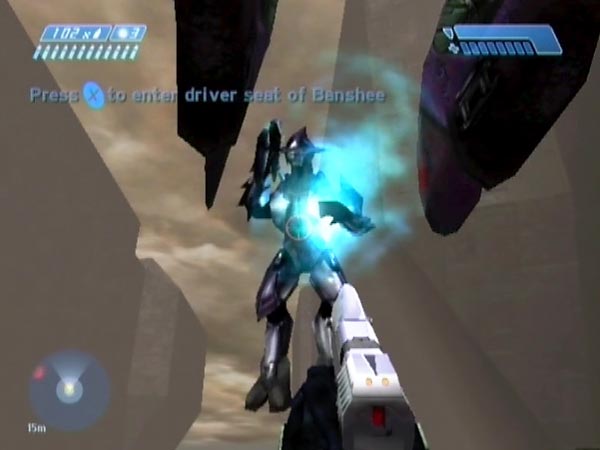
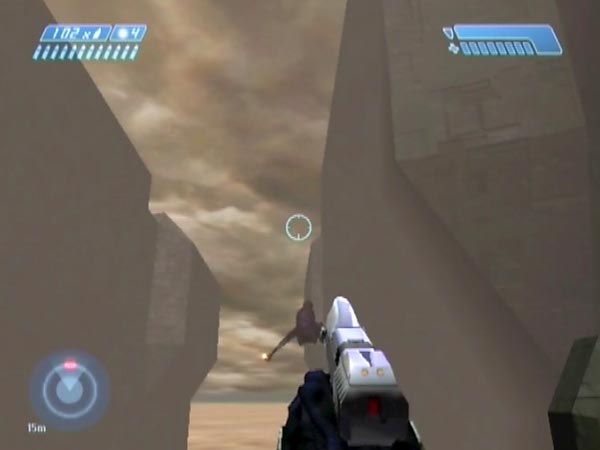
If you're lucky (the chance of success can actually be near 50%, based on a test I did with the fast retry plan) the grenade passes through and tags the pilot, in which case he bails. As the Banshee is about to pass overhead, jump straight up and mash the X button. There should briefly be a boarding prompt, and your mashing should get you aboard (it's easy). Don't be distracted by the emerging pilot; just calmly focus on the snatching. Initially the Banshee is still on its scripted path and you have no control, but it frees up after a few seconds.
Note: Sometimes the grenade may pass through the nose yet not tag the pilot (there's an example in BCM163). It might tag a part of the interior or a tail fin, or it might hit nothing and continue on through the air.
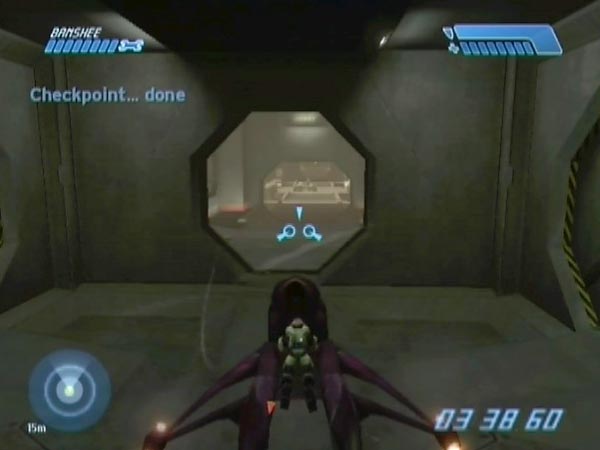
Not long after boarding, the usual post-rendezvous checkpoint is triggered, but the threat from the other Banshee will delay it, and potentially cancel it before long. To try and get it, quickly get clear so the game considers you safe. It's a bit fickle and I discussed options in my earlier article, but in light of new experience I recommend promptly whizzing onwards into the ship and through the next opening too. One virtue of checkpointing like this is that if you then elect to head for the hangar, Cortana won't be nagging you about getting back into the hog (a quirk relating to getting on your way promptly). Going even deeper may improve your chance of getting the checkpoint, but I'm not sure. The checkpoint gets cancelled a few seconds after Cortana stops talking, so if you haven't had it by then, hard luck; your chance is over.
NB: Unlike in the case of overloading, destroying the other Banshee fast does not seem to be a viable option for checkpointing, despite clearly removing all enemy threat. I've tried it four times via quick fuel rod blast (using two different saves) and never once got the checkpoint. Strange. But in any case it's nice to have the Banshee still present after checkpointing, so you can always have fun with it if you want.
I think I described pretty optimal aiming and timing for the throw, but there's nothing to stop you trying earlier throws too if you wish. The pilot would still bail if tagged. However, such throws can easily make you a bit rushed for the all important close throw. So since you're also rather unlikely to score a hit, it may be counterproductive to try them.
I've focused here on standing just past the middle of the right rim because I think that gives the highest reliability for getting throws on target - partly because the Banshee will be coming almost straight at you. But just as in the overloading method, there are various positional options for making the snatch. You can use another option if you like, but obviously my specific throwing advice will no longer apply.
Note: It would've been nice if a checkpoint could be delayed until sometime well into the drive, so that each time you fail to snatch the Banshee, it wouldn't take so long until your next attempt. However, it seems that no checkpoint can be delayed appropriately. Still, this idea brings me to the second plan.
Fast retry plan
In this plan you instead get the post-rendezvous checkpoint before the Banshee flyover, so you can make repeated throwing attempts without having to repeat the long drive. As such, it makes retries fast (hence the name), so it's likely to take much less time to get the Banshee - though you'll only get one flight each time. It's also a good way of getting familiar with the throwing and snatching before perhaps moving on to the standard plan so you can checkpoint afterwards.
At the rendezvous don't stop. Speed on through the next two openings. About-face near the bottom of the subsequent dip in the tunnel (you can start turning when past halfway down if you're careful not to cause a roll through lack of ground contact), and head back up.
About halfway down the dip, you triggered Cortana's "Echo 419! She's gone" line. As far as the game is concerned, the rendezvous is now over. The consequent checkpoint will take a few seconds to appear, and you should get it on the way back. Typically it seems to come when you're about to pass back through the inner opening, as long as you were efficient with the about-facing.
When you're back outside, the Banshees will still be approaching and there should be time to make a snatch attempt in the manner described for the standard plan. But this time if you fail, your last checkpoint was only a short while ago, so it won't be long before you'll be throwing again. In fact you could be making a try every 13 seconds or so, if you got the checkpoint at the place I mentioned; so with good throwing you'll likely have that Banshee very soon. The success rate can actually be near 50% based on my testing (doing 20 snatches took me 42 throws). Incidentally, whenever you see that your grenade has stuck to the outside of the Banshee, there's no point waiting any longer. The pilot hasn't been tagged, so just revert immediately for the next try.
Aside from not being able to checkpoint afterwards, there are two other disadvantages of this plan. One is that your flight will be around 18 seconds shorter due to the countdown having resumed even before you made the snatch. The other is that in the case of heading for the hangar, Cortana certainly will be nagging you about getting back into the hog.
Bonus fun with bailing
The set-up for the fast retry plan is also great for having some other fun with the bailing behaviour. You can tag a pilot and either enjoy just watching him bail, or attempt various types of mischief, such as seen at the end of BCM163. There are lots of possibilities and I expect to be doing a whole movie on that later.
Further benefits
Aside from being much faster, there are further benefits of dispensing with overloading and using tag-snatching instead. First and foremost, your Banshee will fire as normal, rather than having sketchy or unreliable firing or none at all. It's much more satisfactory. Everyone else will fire as normal too, and there's also no problem with throwing grenades.
Secondly, if you later care to fly on towards the hangar, you'll encounter far more enemies than you'd get with overloading, so you can potentially have more fun blasting them from the air, or whatever.
Thirdly, tag-snatching makes Legendary a much more accessible option; and that's the best difficulty level for dogfighting with the other Banshee because it takes the most amount of fire to destroy it, giving you more to get your teeth into. On Legendary, doing all the Flood killing needed for overloading would be a rather tough job to say the least. I never did get around to tackling that - and happily now I'll never need to!
Incidentally, doing a snatch using overloading hasn't been made totally redundant by the new method. Overloading enables you to see various oddities, including weaponless enemies. But that would be the only point of using it I think.
Other comments
Grenade pass-through
Although the bailing behaviour came as a surprise to me, the phenomenon of a plasma grenade passing though the exterior of a Banshee and tagging the pilot was something I'd already seen elsewhere in the game, notably when battling Banshees in level 2 (there must be quite a few examples in my movies). However, I'll admit to being surprised how easily it goes through, when you've got a head-on throw such as here. Based on my testing, it seems like the odds could actually be near 50-50 with ideal targeting!
Tagging via the canopy gap
If you're not directly in front of the Banshee, it's possible for a grenade to sneak through the gap between the fuselage and open canopy, and tag the pilot that way. It doesn't have to go through the nose - though that's certainly easiest.
The left pilot
The left pilot has the same behaviour as that of the right, just as you'd expect. He'll bail if tagged prior to activation. However, his Banshee flies way too high for you to be able to jump up and board. It's a good job Bungie scripted one of the Banshees to fly low, or we'd never be doing any snatching at all!