Descent trick at the first bridge
Posted March 24th 2005, expanded later
Associated movies
- BCM7 - Level 5, Heroic; Descent trick at the first bridge (1:34)
But see also BCM8
Believe it or not, it's possible to fall to the ground from the first bridge and survive, as long as your fall gets cushioned appropriately on the way. It's a trick that opened the door to a huge amount of new fun for me, leading to a lot of new site material. I'm not sure of its origin, but thanks to One One Seven for mentioning the general idea to me in October 2004. Sadly though, the trick is only suitable for the PAL version of Halo. It involves a long fall to a ledge, and with NTSC or PC you'll probably find yourself dying before reaching it (see here for some discussion, and here for cocopjojo's demonstration of failure on the PC). There are other methods of descending however, and for most purposes they'd do just as well if they work for you.
Postscript, March 2011: Having now become familiar with other descent methods, I've put together a comprehensive Bridge descent guide. I've retained this older article however, which goes into greater detail on this particular method (covered in the descent guide here).
The method
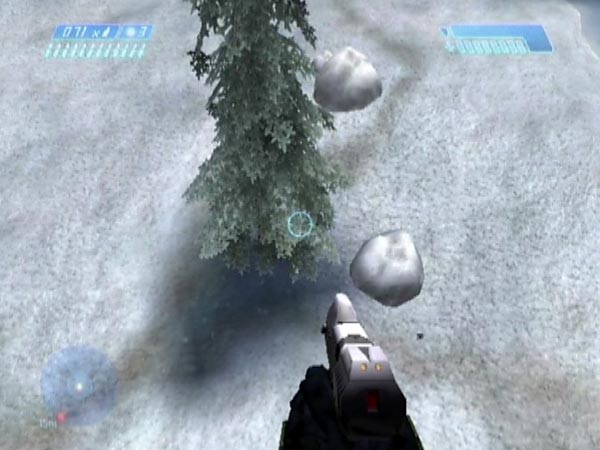
With perfect health, get to the far end of the lower deck and run diagonally off the left corner (don't use the jump button, just run). The exact angle isn't too critical because you can always make small course adjustments with drift, but if you start by standing midway between the two final deck braces and aim for a spot about a foot to the right of the deck's corner, that's just about perfect for ending up hitting the ledge in the right place, namely the small darkish patch where the ledge bends around very slightly. You'll need to hit just past the bend. As you near the ledge, be in contact with the cliff wall so you hit the ledge at the back. Preferably also have your back facing the wall by this point, so you'll be facing the direction you're about to bounce off in; that should make things easier. Crouch as you hit, to slow you up a bit. Bounce directly away from the cliff then off the lower part of a tree, then off the side of the rock just to its right, crouching as you hit the rock. If you get it right, these successive impacts cushion your fall enough for you to survive, maybe even with perfect health.
However, the rock's geometry is a major factor. This gets randomized at the loading point just before you come outside. There seem to be five possible designs, and each design will always have the same orientation. All are survivable - maintaining perfect health even - but some are much friendlier than others. The best one is of medium height and has a nice rounded side, which you can see in BCM7 and also in the picture on the left. With that rock I was able to make the descent 92% of the time when I did some testing (50 consecutive tries). Moreover, on almost every success my shield didn't even flicker! There are two taller rocks which are likewise good prospects. Those gave me success rates of 80% and 56%, though I was usually left with poor health. The other two rocks are bad news and gave me success rates of 12% and 4%. The first of those is a smallish two-humped rock of medium height. As you descend, you can recognize it from the egg-like shape of its base, with a pointy end off to the right as you approach. The other is a very low rock with a side which is decently rounded but a very thin target to hit. You can recognize that one from its square corner on the right as you approach.
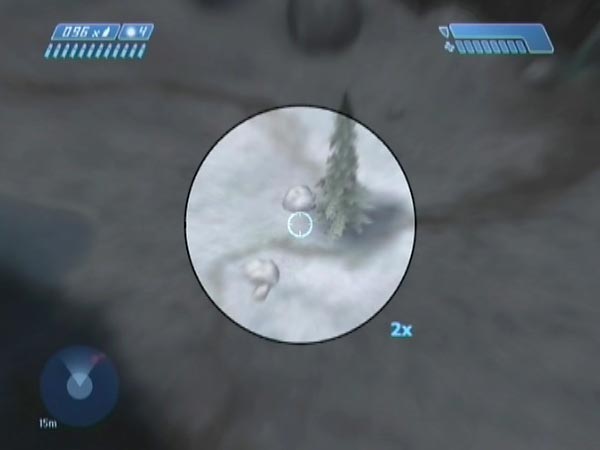
Selecting your landing rock
If you want to get the best rock - or at least avoid the worst ones - the easiest and quickest way is as follows, if you've learnt to recognize rocks from the bridge. Get a checkpoint just before crossing the loading point in the passage. There's one triggered halfway along the second section of the passage, whereas the loading point is at the start of the final black stripe in the third section. For extra convenience, keep the checkpoint delayed until right near the loading point by jumping as you run. Go through the door and straight over to the edge, then jump on the spot to get a brief view of the landing rock with a zoomed pistol. If you don't like it, just revert. The rock gets randomized again as you go through the loading point, and maybe it'll be acceptable this time. Repeat as necessary; it shouldn't be long before you get what you want.
If your rock recognition skills aren't up to par however, here's the much less efficient way. Get a passage checkpoint before the loading point as already described, but also save it. Continue things as normal, to the point where you're actually attempting the descent (or, possibly, to a point where you finally can recognize the rock). If you don't like the rock, you can start over from the passage checkpoint by either reverting (if you haven't had another checkpoint since) else ejecting and reloading.
Handy checkpoint for repeated attempts
To make things as convenient as possible for repeated descent attempts, get a checkpoint when you're at or near your descent spot. That way, it won't take more than a few seconds per attempt, and it'll feel easier to slightly modify your descent from attempt to attempt if needed. Here's how you can arrange this.
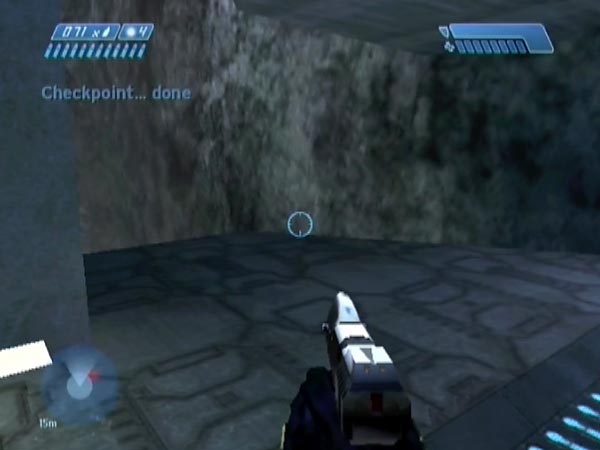
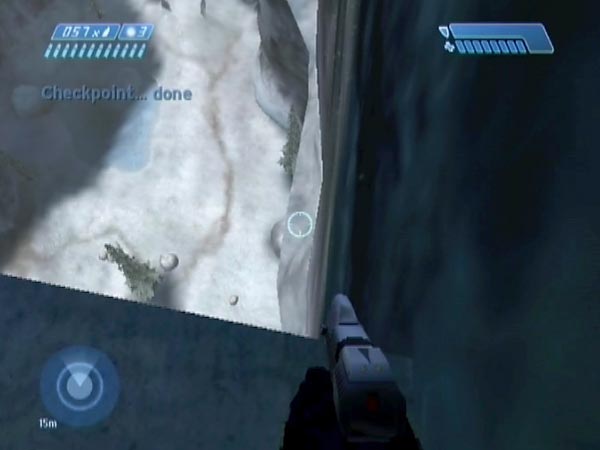
A few metres before the final pair of glass panels on the upper deck, you trigger a checkpoint. Keep it delayed until you're in position for your descent attempts, for example by jumping until in position (or lob a grenade somewhere, causing the checkpoint to be delayed until the bang). You should then get the checkpoint as long as the game doesn't consider you under enemy threat - which should be the case if you took care to kill everything moving beforehand (the game may continue the delay if there are covies active on the upper deck, even though they don't have a line of fire to you).
You may like to use the following more specific routine which I find fairly reliable, and which you can see in BCM7. Staying back from where the checkpoint will be triggered, kill any enemies that show themselves ahead (typically just two Grunts on Heroic), and shatter the glass panel ahead. Advance and let yourself fall down through the hole, then move to your starting position for descent attempts, jumping on the way to keep the checkpoint delayed. You won't have far to go, so probably only one jump will be needed.
Note: An alternative checkpoint you can delay and use is the one that gets triggered a short way into the passage through the far door. Specifically, the trigger point is halfway along the short section when you turn right. In this case you may as well take the opportunity to kill all covies first, leaving you completely unthreatened.
Alternative run-off spot
An alternative run-off spot is the nearby bridge support attached to the wall, which you can jump onto quite easily from the lower deck if you hold your nerve. I was wondering if this this might be low enough to allow NTSC and PC users to survive the fall to the ledge, but unfortunately it looks like it's not. See here for a demonstration of failure on the PC by copopjojo, in which he dies while still a few metres from the ledge (he tried many times).
Although viable, I find the descent considerably harder from here. Without corrective measures, there's a tendency to end up flying past the right of the tree, due to the fact that as you arrive at the ledge, the component of your speed along the direction of the ledge is greater than it would be if you'd used the normal run-off spot. You can correct this somewhat with drift, just as you're approaching the ledge. That is, quickly apply some drift in the opposite direction (the direction from which you've come), so you end up hitting the ledge closer to vertical. But it's not easy, and I also find it harder to make sure I'm against the cliff in the final moments.
Further notes, just for interest
While checking out some things for my revision of this article with the release of BCM7, I made a few discoveries which I don't think are of much practical value but I'll add them here anyway.
(1) With the best rock at least, it's possible to survive without doing any crouching at all! So although crouching should help, it's not critical. I didn't check the other rocks, but I suspect crouching is a lot more important for those.
(2) You don't have to have perfect health to be able to survive the descent. With the best rock, I found that I could survive with as few as two bars of health (and as usual with that rock, my shield didn't even flicker). I didn't try things with the other two 'good' rocks, but they tend to take some of your health away when you hit, so I expect that having perfect health is considerably more important for those.
(3) You don't necessarily have to hit the front of the rock. With the best rock, I was able to survive by hitting the tree and then the far side of the rock, usually causing me to be sent shooting over towards the Shade plateau. It was hard to get it to work though. I didn't investigate the other rocks.
(4) A well as the variable rock geometry, the tree can vary in size. It looks to be the same tree design but stretched by varying amounts. But it's not very noticeable and I doubt it makes much difference to your survival chances.
Speed challenge
Here's a little speed challenge for you, just for fun. Killing all enemies on your way, and also destroying any Banshee, see if you can get down to the ground before the Pelican has flown past the tree. There's just time if you really blitz the baddies; in fact you can even get down before the Pelican has started moving off! You don't have to bother with enemies that emerge from near the far door, but all covies prior to that must die. This challenge arose from when I was filming for BCM7, when I decided it would be nice to have the Pelican flying by after I got down.