Setting up
On this page I describe how to set things up at a particular location which works well as a launch site. Other locations can be good too but I cover that later. In the initial routine described here, the Elites will be aboard their Ghosts and you get them frozen by ejecting them with a Banshee blast. In revising the article however, I've added an easier variation (discovered later) in which the Elites end up pre-frozen due to their Ghosts having been already overturned. So that's what I recommend, if you're new to this.
Basic routine for ejected Elites
Here's a plan for ending up with frozen Elites who potentially have flickering shields, the flicker being due to a Banshee blast which overturns their Ghosts and ejects them. If you're especially keen to have flickering shields (they do look quite nice), I recommend using Heroic because you get them less often on Normal - presumably because shields are more easily penetrated. Using Easy isn't recommended, as the Banshee blast would usually just kill the Elites.
Do some rearranging
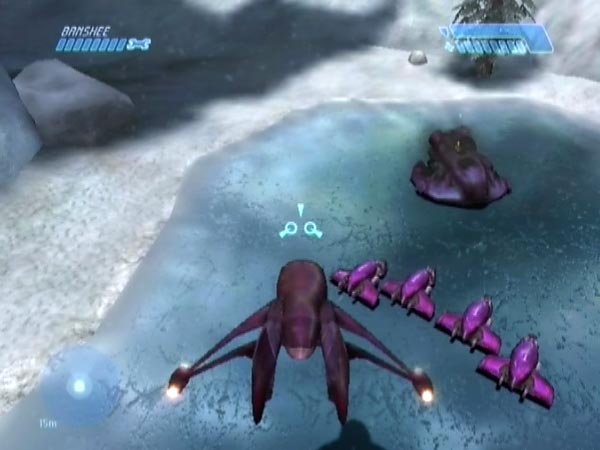
You need to start with some rearranging. In my Ghostly fun article I talked about the two Ghosts that normally come in to attack you in the crashed Pelican area. The Elites that teleport into these are going to be your fireworks. Move these Ghosts into the later area with the huge tower. Destroy the Wraith (it'll get removed later) and put them close together a short way off the front. To hopefully prevent them getting driven off before you blast them later, impede them with two other Ghosts placed to the front sides as shown in the picture. I know it doesn't look like it'll help much, but the pilots aren't too clever so you should be ok. There are two Ghosts very close by which you can use.
Get the twin bridges Banshee from the later twin bridges area and use it to blast down or push off the tower Banshee to be sure it won't attack you later (it could also come in useful as a healthy replacement). Also overturn any Shades or Ghosts which could be a threat later, including a Ghost at the bottom of the tunnel.
Return and play through towards the Ghosts
Fly back to the first bridge to resume normal play. From here to the end of the underground bridge, preferably kill all triggered enemies aside from your firework Elites (who teleport when you're part way across the crashed Pelican area), and also make sure all Marines die. This should help maximize the game's handling capacity in your launch area later, which is good. You can skip some things if you like, but one essential is to trigger personnel in the crashed Pelican area else you won't get your two Ghost pilots. Talking of which, make sure Johnson doesn't snipe the one in the tunnel. That would not be helpful!
In playing through, you can start by letting your Banshee slip off the edge of the bridge while you head inside, so it'll be waiting for you when you emerge at ground level. From there you'll be able to use it do all the killing quite easily, but if you prefer to do some of it on foot go ahead. Get the rocket launcher and sniper rifle; you'll want them for your firework fun. Also have four plasma grenades.
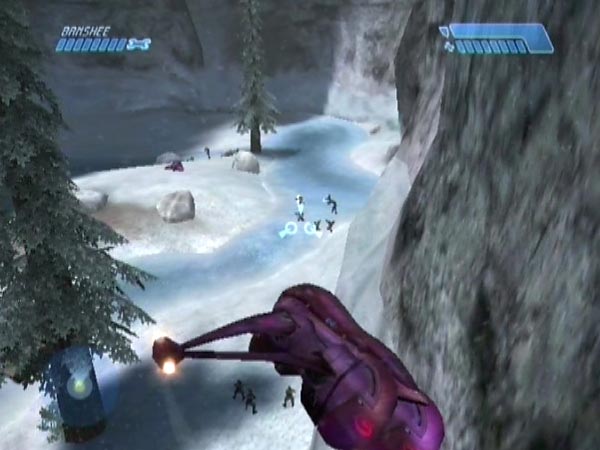
In the tunnel after the underground bridge, don't kill any needler-wielding enemies yet. Let them chase after you as you head for the exit. Near the start of the rise you trigger a checkpoint associated with an arriving dropship, and you want that checkpoint to be delayed until later. If you don't wipe out all the Jackals, you can expect it to be delayed all the way up due to enemy threat. But if you do wipe them out, you can always keep the checkpoint delayed using Banshee fire. Once you're near the exit, the delay will continue automatically due to the dropship's proximity. Just near the tower, pause to let the dropship troops dismount, then overturn the dropship Ghosts with a blast between them before they get manned (like in my refined routine for setting up a spiral path megabattle, where there's a picture of it).
Get the Elites frozen with a Banshee blast
Fly towards your Ghosts, continuing the checkpoint delay with Banshee fire if necessary (firing would be redundant if the dropship remains near as it departs). Stay above the lower treetop level as you pass the tower, to avoid triggering enemies from within yet. In any case you want to be fairly high when you get near the Ghosts. Allow yourself to finally get the checkpoint. You'll need to be sufficiently distant from the Ghosts that the game considers them no threat.
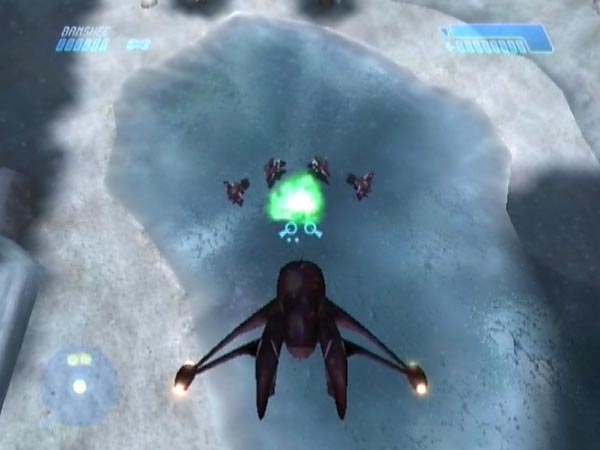
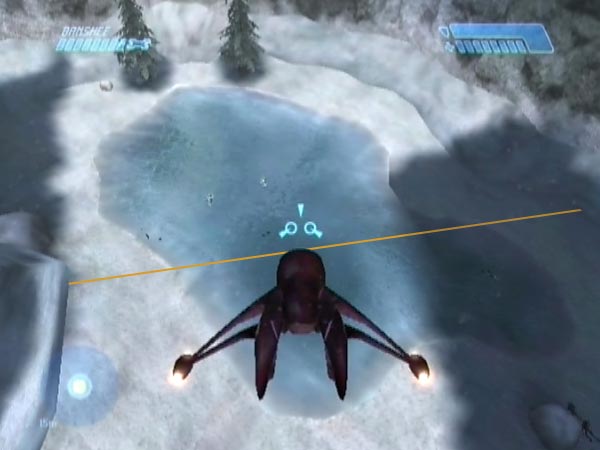
Dive in and try to overturn the Ghosts with a blast near where their fins meet (you may need to get their attention with a spot of plasma first so they turn your way). You'll want to be quite high when you fire, otherwise aim assistance kicks in and diverts the shot to one of the Ghosts. To get flickering shields you'll want to make sure the blast is distant enough that it doesn't penetrate them. If you see that the Elites have been ejected - and consequently frozen - go down for a closer look to check a few things which affect how convenient they'll be to launch. One is that you don't really want them too high off the ground as it can be harder to needle them and aim them as you'd like. The other is that they can exhibit a weird anti-aim effect (check with your rocket launcher), and you don't want it to be too strong as it can be awkward to contend with. If you're unsatisfied with anything, the delayed checkpoint makes repeat attempts quick to do.
Kill everyone and prepare the launch site
What you want to do now is kill everyone and form a weapon collection near your Elites - but far enough away to be clear of rocket blasts of course. The main ingredient is needlers. You want as many full ones as possible (they're the most convenient to use). Here are some tips.
Try to let most needler-wielding enemies get near your launch area before killing them, so you won't have far to move their weapons; but don't let the frozen Elites get killed by stray fire. Try to keep freshly dropped needlers in sight until you have a chance to pick them up - if only briefly - to make sure the game doesn't remove them. The sniper rifle should be great for a lot of the killing but I'd recommend picking up a dropped plasma weapon as backup for enemies you get closer to - and in case you run short of sniper rounds. Don't forget the enemies in the tower, or the Banshee pilot on top who sometimes has a needler.
Caution: Once you've triggered enemies in the tower (simultaneously getting a few would-be Ghost pilots outside, plus a Wraith pilot who spawns in the pass), you'll also be able to trigger the pass guards, namely two Hunters and two Elites. Be careful you don't get taken by surprise, or things could get nasty! Once you've killed one Hunter, the other tends to retreat into the pass. Don't forget about him.
When you've wiped everyone out, combine needlers efficiently to get as many full ones as possible, and move them into position. Add the rocket launcher from near the tower so you'll have two. You could even get a third from beyond the pass if you want it, but two seems plenty. Add your sniper rifle too, and anything else you want - maybe a pistol for shooting fireworks in mid-air? You can arrange your weapons as you please; I like to keep my spare full needlers in a pile of their own for ease of retrieval. End up carrying a rocket launcher and needler, and a full stock of plasma grenades (I suggest you ditch any frags). Optionally, clear your launch site of Ghosts so they won't get in the way.
On a good day you might get five full needlers out of all this, but the yield is partly down to luck and you might struggle to reach three, though that's still enough for some good fun. On Heroic I think the average yield may be lower than on Normal. If you want even more needlers you can get some from enemies beyond the pass, but then you'd lose the ability to later do pre-blasting for launch fun, a technique requiring the pass checkpoint. If you do trigger more enemies, preferably kill them as usual.
One other thing to mention here. Later on you'll be launching a firework by doing some rocketing and needling or whatever, then crossing what I call the release line to unfreeze your victim. That line marks the edge of the launch zone and you'll want to make sure your spare weapons are within that zone, otherwise you might not be able to access them without launching your firework prematurely. See the picture for guidance. The release line is straight (as seen from above) and actually continues around the corner, slicing diagonally across the pass.
Get a convenient save checkpoint
All you need now is to get a delayed checkpoint at your launch site, ideally when you're standing in front of your Elites ready to start work on them. The option I recommend is to fly back for a tunnel checkpoint. Delay it with Banshee fire until back at your firework site, then fire off a blast just before dismounting, and continue the delay with jumping until in position. The alternative is to advance sufficiently far through the level to trigger some other checkpoint to delay (it could be one for which music is playing if you want your save to feature music), but you'd lose the ability to do pre-blasting for launch fun. If you do trigger more personnel, preferably kill them.
Getting pre-frozen Elites instead
You can make the set-up work simpler and easier by instead overturning the two empty Ghosts rather than impeding them. When you return to an overturned Ghost later on, you'll find the pilot already frozen. I found this by accident, long after posting the original version of my article. I hadn't tried overturning the Ghosts before; maybe I assumed the pilots wouldn't be transported to them. Aside from saving you the trouble of impeding the Ghosts and ejecting the pilots later, there are potential advantages to the end result of this method, and I'd have to say that pre-frozen Elites are now my fireworks of choice. Details follow.
Position control and the anti-aim effect
Rare exceptions aside, a pre-frozen Elite will have grasp of his weapon (unlike most ejected Elites) and will be in one of three general positions relative to his Ghost: standing on the ground to the front right of the Ghost as you look at the nose, standing on the Ghost itself, or in the air above the Ghost, probably looking as if he's been rudely ejected and is getting ready to land. To start with I thought this was random, but then I did some testing and realized that you actually have some control over things, according to what tilt you give his Ghost!
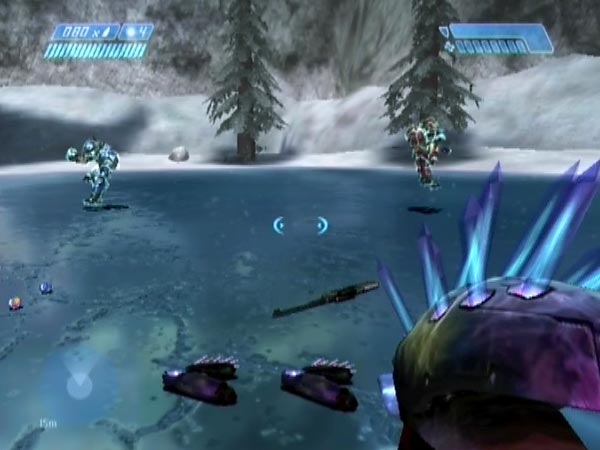
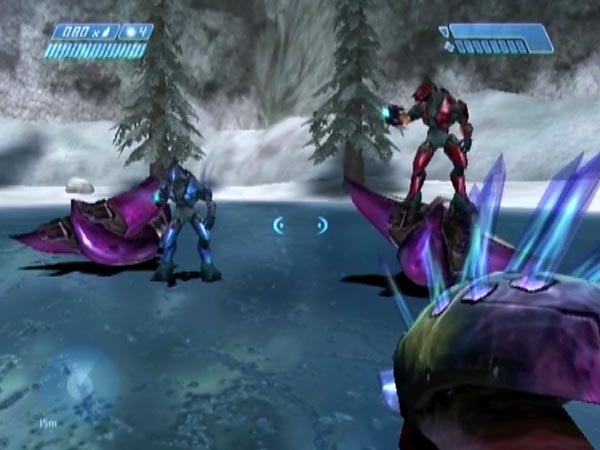
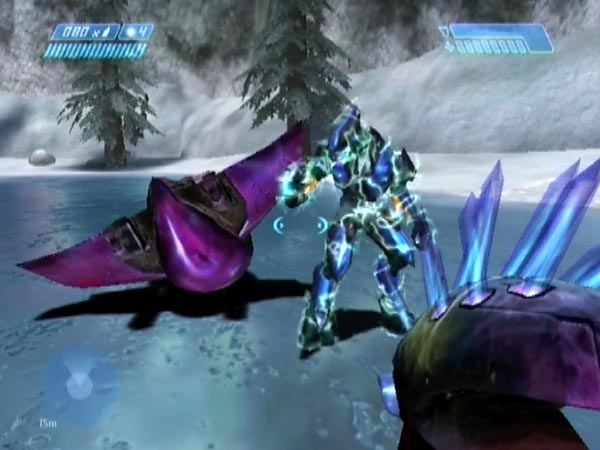
If you give it 'left tilt' with the left fin down (easily done with melee), the pilot will usually end up on the ground to the front right of the Ghost, like the blue Elite in the picture here, and is unlikely to have the anti-aim effect - a major plus. I'd say this is the position to favour, not only for launching purposes but also because it's easy to needle him, and it's the most natural looking. His being on the ground doesn't stop you launching him vertically, and it's easier to judge the right spot to aim at, compared to when you've got an Elite quite high off the ground. It's also easier to launch him at shallow angles. His lower body will usually be facing the same way as the Ghost, but his upper body may be turned somewhat.
If you give it 'right tilt' he'll get one of the other positions, but most likely standing on the Ghost, like the red Elite in the picture. An Elite on a Ghost may exhibit the anti-aim effect to begin with, but it probably won't be strong. Strangely, he might start exhibiting the effect if you remove the Ghost from under him, but in my experience it'll still only be weak. His shins will be at your eye-height, so he's fairly high up, but he's still reasonably good for launching. His lower body will probably be facing the same way as the Ghost. Meanwhile, an Elite above the Ghost would be rather inconvenient for launching because of his height - typically high enough to walk under. As well as that, you can expect the anti-aim effect.
Interestingly, if you give a Ghost too little tilt either way, on return you can find that it's acquired a significant tilt one way or the other.
Arranging your overturned Ghosts
Here are a few tips on fine-tuning the position, direction and tilt of your overturned Ghosts before you fly off. Melee is fine for small adjustments of position, but for more of a shunt you're better off pushing it with a Banshee. For rotating a Ghost, use the nose or leg of a Banshee (you'll need to be very gentle if the Ghost is on ice, due to the low friction). Melee gives hardly any rotational effect no matter how you hit the Ghost. In particular, if you hit the back of the Ghost it doesn't cause the Ghost to swing round. It moves the Ghost wholesale, contrary to what you would've expected from a more correct simulation of physics. Melee is good for adjusting the tilt however. Hit the low side to raise it.
Getting the Elites as desired
The tilt-based control I mentioned for the position of an Elite was only partial. If you have very specific desires for how they turn out, you may need to make repeated attempts despite doing your best using tilt. Originally I though their postures were determined once they'd teleported, but in fact, posture only seems to get settled as you cross the loading point after the underground bridge. If you save a checkpoint just beforehand (see Needler provision for advice on getting one), you'll be able to eject the disc and reload for another try each time you're unsatisfied with how the Elites have turned out. Actually you could make things more convenient as follows. When you get the checkpoint, head forth with the Banshee firing to prevent getting a checkpoint just after the loading point, and also make sure to keep the dropship checkpoint delayed. Land at your Elites for a look, still delaying the dropship checkpoint (by jumping or by lobbing a high frag grenade). If they're not good enough, you can now simply revert to get back to that starting checkpoint in the tunnel.
Removing a Ghost from under an Elite
If you want to remove a Ghost from under a frozen Elite to have a nice clear launching spot, that can be tricky because he could get killed by contact with it. However, with care you should be able to get it clear with melee or by pushing it with the nose or leg of your Banshee. The leg can often sweep the Ghost out cleanly, and that's the first thing I'd try. But it's a good idea to get a delayed checkpoint before attempting removal, so you can revert for another go if you kill the Elite. I suggest using the dropship checkpoint and doing it before any pursuing enemies arrive, but an alternative would be to use a delayed tunnel checkpoint later. If you get a spray of purple blood, you killed him.
Closeness advantage
An advantage of using pre-frozen Elites is that you can easily get your Elites close together if you want, by placing the overturned Ghosts close together and with the appropriate tilts for pilot position control. Close Elites could make for a striking look when doing simultaneous launches. In general, you have much better control over positioning when using pre-frozen Elites.
Getting a flickering shield
If you want a pre-frozen Elite to have a flickering shield, hit him with weapon fire just before you trigger teleportation by advancing far enough. That makes his shield flicker, and the flicker seems to get preserved when he teleports. It's easy enough with the tunnel Elite, but the other guy is not readily accessible and the only way to even see him before he teleports is to get up high, so I don't think it's going to be possible to get both of their shields flickering, unless perhaps you can get the hidden one into rage mode to bring him into the open. The possibility of having two flickering shields is the one advantage of using ejected Elites, though it's only an aesthetic issue really.
Could use Easy
Because you don't need to eject the pilots with a Banshee blast, you can use Easy with this method if you like. However, I still wouldn't recommend it because it's a bit easy to accidentally blow yourself up with a rocket launcher. Your shield is a lot weaker.