Other locations
This page concerns using other launch locations and the situation in general, and in particular it shows you the release lines available for use.
- The wider picture
- Release lines illustrated
- How to find release lines
- Considerations for a good location
- Comments for particular locations
- Using upright Ghosts
The wider picture
My set-up page described how to set things up at a particular place which makes a good launch area, but actually you can have your Elites just about anywhere in that entire loading zone, which starts from just after the underground bridge. Within this zone there are various lines you can cross to cause the release of a killed frozen Elite, just like the one used with my original area. You'll normally want to place your Elites conveniently close to at least one such line so you can have a good view as they launch, but that still allows plenty of options. Obviously the set-up work may need some adjustment from my original routine, but that shouldn't be much trouble planning out. The general principle is: arrange the Ghosts as desired, fly back and play through to them (possibly skipping some enemy elimination and/or triggering to speed things up), prepare the launch site and get a save checkpoint. Check through this page for further advice.
Actually, release planes
I've been talking of release lines, but what we're really dealing with there are vertical release planes. A release 'line' is simply where the corresponding release plane intersects the ground, and it's why the line is straight, as seen from above. Crossing the line means passing through the plane. That's what causes the release. You could be passing through the plane on foot, or up high up in a Banshee.
But wait, there's more! As well as these vertical release planes there are some horizontal ones (I think they're horizontal), quite high up. This means that you can potentially launch fireworks just by ascending or descending through such a plane in a Banshee. I need to do some more investigation of those so I'm not going to say much more about them yet, and they don't have as much practical importance anyway, but I just wanted to let you know they're there.
Release lines illustrated
Now to detail the release lines in the loading zone, to help you decide on launch locations to try out. I'll show them in a numbered series of pictures, starting from the loading point after the underground bridge. As usual, click the thumbnails to see full-size images.
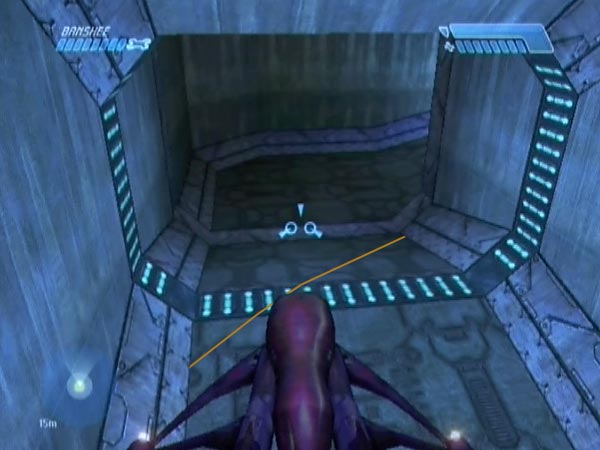
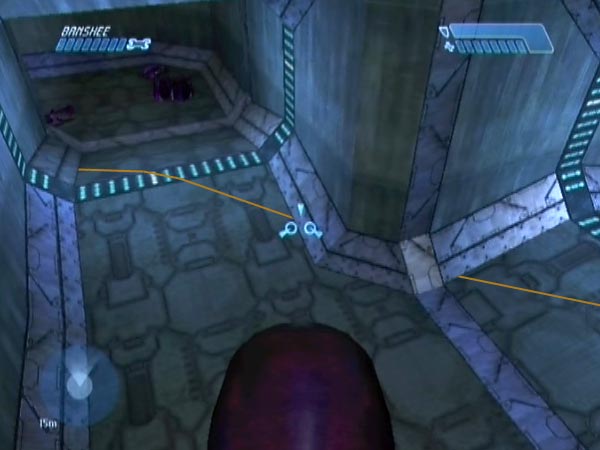
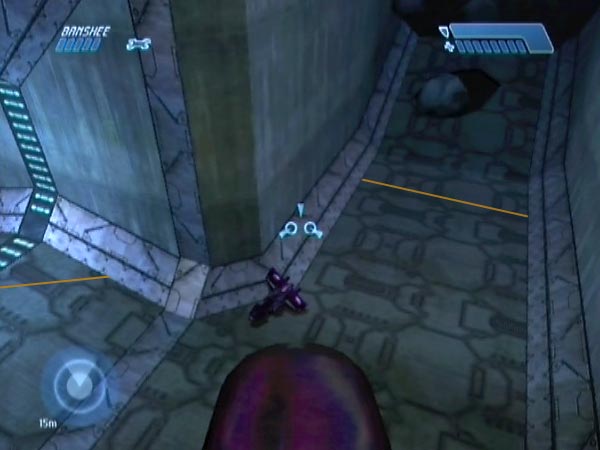
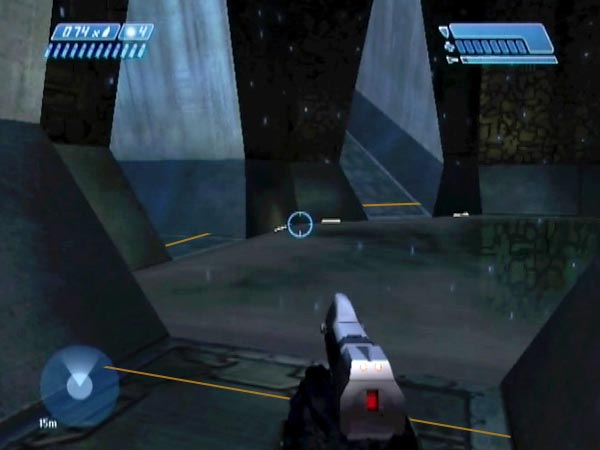
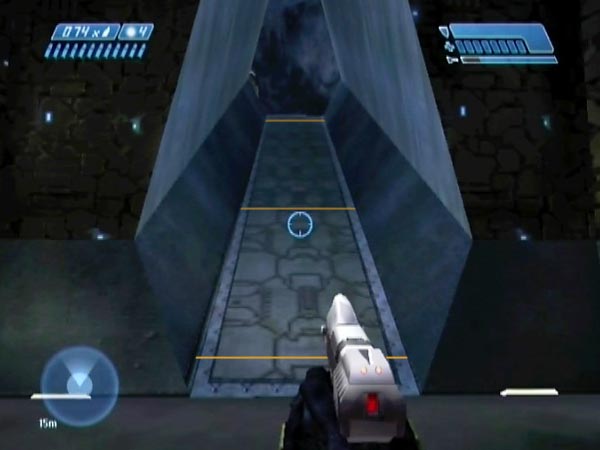
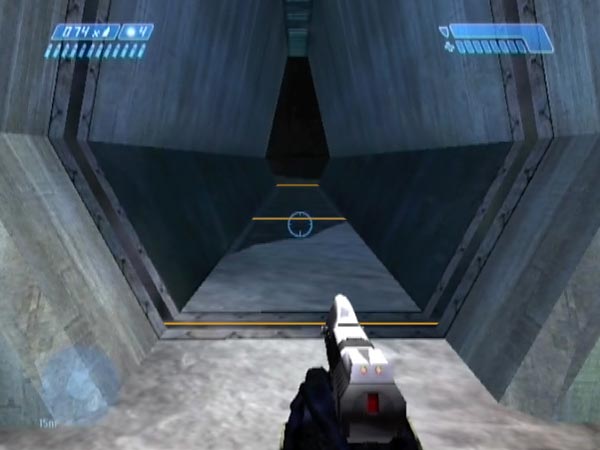
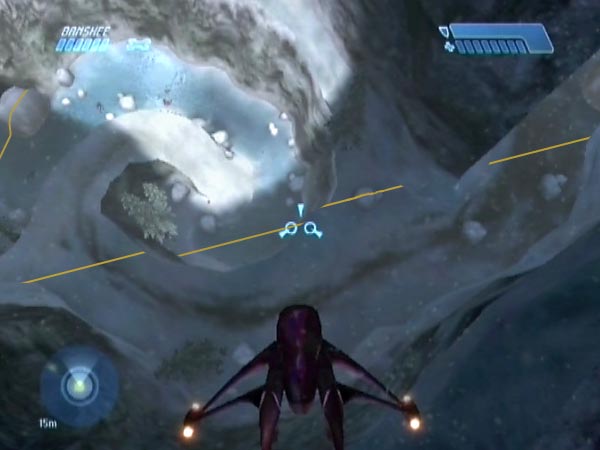
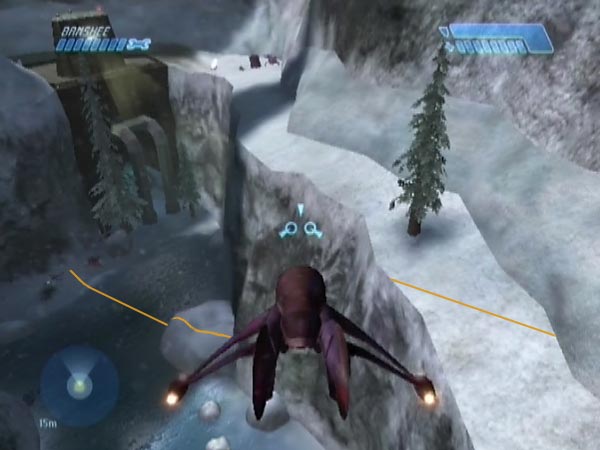
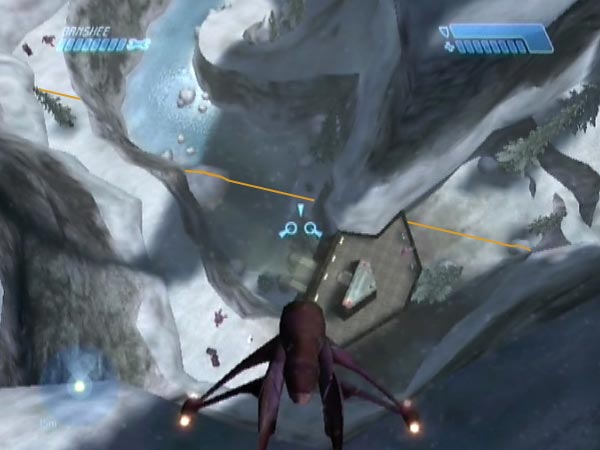
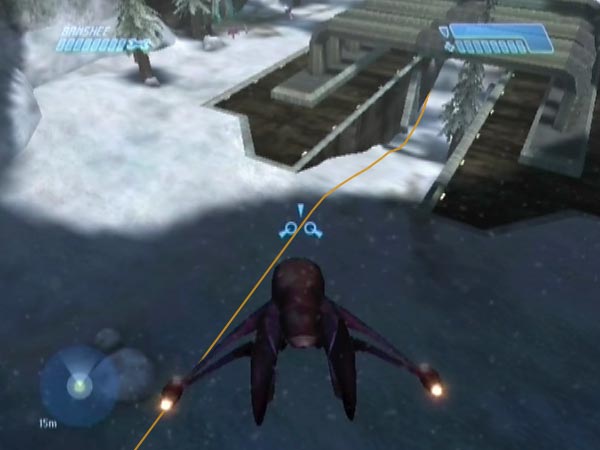
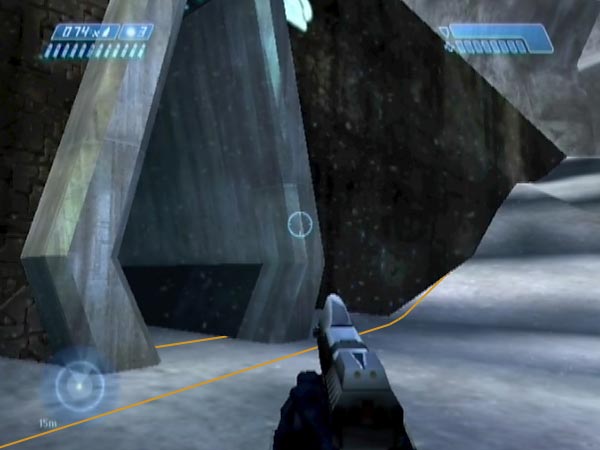
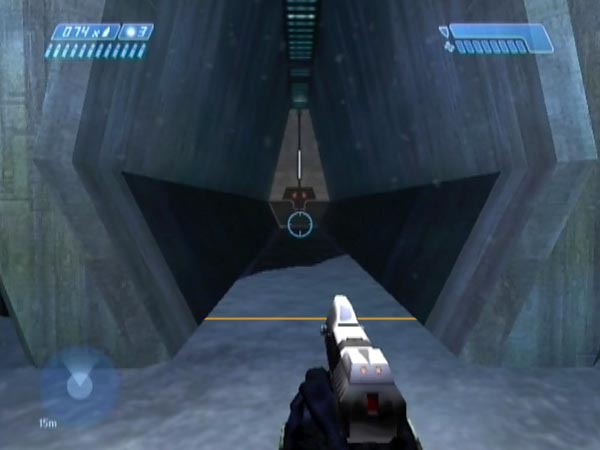
In picture 1 we're pretty much over the loading point half way across this section of tunnel, where the paving dips. A release line crosses the tunnel diagonally and continues around the corner, as seen in picture 2. The end of that continuation can be seen in the left of picture 3 (it doesn't continue around the next corner), and there's a new line across the tunnel just before it rises.
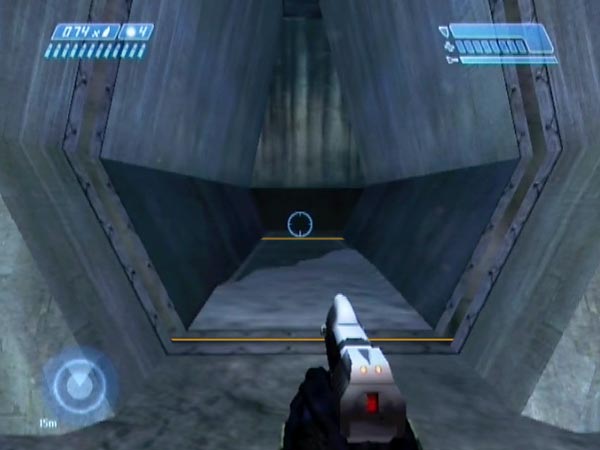
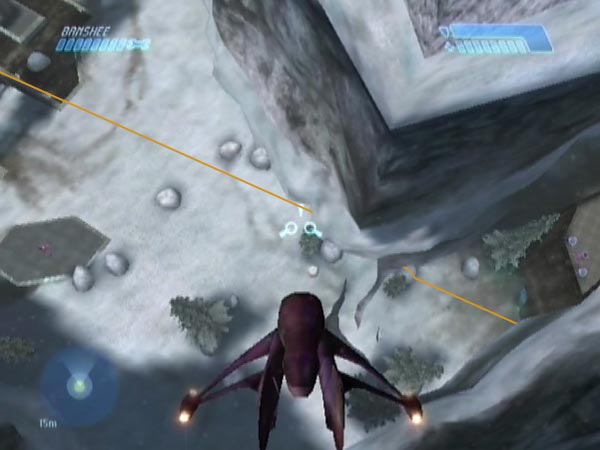
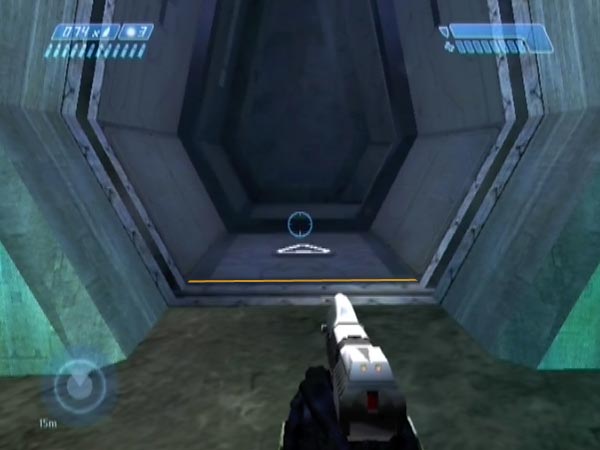
There are two more lines going straight across the tunnel, up near the top as shown in picture 4. The one near the exit is better seen in picture 5, a view looking back down the tunnel with three lines visible. In picture 6 we reach the tower. There's a line across the plane of the 'front door' here, and another just before the passage turns right.
Inside the tower, each of the three passages out from the inner glass floor has a line about half a metre along it, as shown in picture 7. The ramp has another two lines on it as shown in picture 8; one about half way up, and one very near the top. The back passage likewise has another two lines on it, which can be seen in picture 9. One across the plane of the 'back door', and one about halfway along.
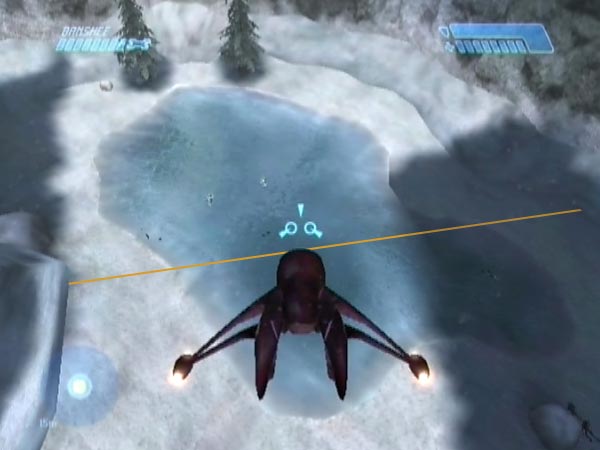
Picture 10 shows my original release line near the pass (as seen in the basic set-up routine), and picture 11 shows it continuing across the pass and beyond, slicing across the ice below and the top of the spiral path. The pass section was also seen in my talk on pre-blasting if you want a close-up. To the upper left of picture 11 you can also see part of the next line, which is the focus of picture 12. It cuts across the ice near the underpass entrance and continues to the right, eventually slicing across the Shade ledge.
Picture 13 gives a higher view, revealing the line's continuation across the sunken area after the underpass, but that line isn't done yet. It continues all through the twin bridges area as shown in pictures 14 and 15. To the top left of 14 you can see it about to go off the edge of the platform after which it continues along the snowy trough and past the rocks at the back.
Picture 16 shows a short line just inside one of the trough passages, as well as part of the previous line going along the trough. There's an identically placed line in the opposite passage as shown in picture 17. Finally, picture 18 shows a line just past the plane of the area's exit door.
The loading point after the exit door can also be used as a release line (it's a line near the end of the long section of corridor), but that doesn't seem of any practical interest and I haven't bothered picturing it.
Going further?
I was wondering about having my Elites even further into the level. However, when I tried arranging for a pre-frozen Elite in the room after the loading point (with the mass of sleeping Grunts), he turned out passive (standing around breathing) rather than frozen. Surprising and interesting, but not firework material. As for trying further, there's a problem. As far as I know, it's impossible to get a Ghost up in the lift. It'll just sink though the floor as the lift rises.
How to find release lines
If you're wondering how I found the lines, here's the general procedure.
Arrange the Ghosts and play back to them
Start with a save in which you've moved preferably both Ghosts into the general area you're interested in. Move them to a couple of places and overturn them, then fly back to the first bridge. Skipping as much as possible to save time, resume normal play and head back to the Ghosts, triggering enemies in the crashed Pelican area on the way (so you get the pilots), and preferably also acquiring a needler and sniper rifle. Make things sufficiently safe to land near a first Ghost, and get a handy delayed checkpoint.
Do some detection work
Now comes the detection work. Kill a first frozen Elite, preferably giving him a bunch of needles, then move around the area until - maybe - he unfreezes. This is where those needles can come in useful, because you'll quickly hear a bang (much faster than the delayed bang of a plasma; and if you use the right amount of needles the bang will be near-instant). Sound can be important because he might not be in sight for you to see him die, depending on where you've wandered. You now know that you just crossed a release line. As such, you know a point on it. Make a mental note of it or whatever. It could help to shoot the ground there, then stand back and take stock of the mark in relation to nearby features. Even better, you could be recording video so you can look at the image later.
Now either revert to start the 'kill and wander' business again, or perhaps just kill the other Elite from near where you are (a sniper rifle could be handy there, which is part of why I recommended it), to seek another point on the line. Getting the idea? In due course the line should become clear, and you can begin searching for other lines using one or both Elites. Incidentally, a sniper rifle can also help you quickly take care of any approaching enemies you didn't dawdle to take care of earlier. But if you're using a low difficulty for minimal hassle, you might be happy with just a pistol.
Start over for new ground
Once you've checked all the area which the Elites are convenient enough for (or as much as you want), you can eject the disc and reload to start over, moving the Ghosts to other places to advance the search.
Considerations for a good location
In deciding where to put your Elites (or just one Elite if that's all you want), here are some things to bear in mind.
Proximity to release lines
As already mentioned, you'll probably want your Elites conveniently close to at least one release line so you can have a nice close view as they launch. One exception is that you might be specifically interested in launching by passing through a horizontal release plane (by ascending in a Banshee), in which case release lines won't be relevant.
Openness
You'll obviously need to have sky overhead if you want to be able to send your fireworks high and free - not that there isn't fun to be had in more confined places.
Ability to do pre-blasting
If you want to be able to use the useful technique of pre-blasting so you can do rapid repeat launching, you'll need to be able to trigger a new checkpoint (to delay until back at your fireworks) without crossing any release plane, after doing your blasting. It was fortunate that this was possible with the area I focused on, but in many places you won't have that luxury.
Ease of assembling supplies
There's also the matter of how easy it'll be to assemble the supplies you want. In regard to needler provision, there's never going to be any problem if you're happy to do some early collection from the first room and bridge, but if you don't fancy that, you'll be dependent on enemies encountered once you resume normal play after the rearranging phase. The further those enemies are from the launch area, the further you'll have to move dropped needlers, but it's really no big deal. As for plasma grenade provision, it would be handy if you can draw a good number of enemies into the launch zone where dropped grenades are best located, so that's something else to think about.
Clip tolerance
Different locations and set-up routines can give significantly lower clip tolerance to the typical 50 or so you seem to get for my original location in the tower area. I've not checked into this much yet, but I think it may go as low as 9 or so. The reason I say that is because my old set-up method (back in 2005) involved triggering enemies all the way into the twin bridges area - partly because I didn't know about checkpoint delaying - and in that case I was getting clip tolerances between about 9 and 14.
Special possibilities
Some locations may be able to give special possibilities for fun - such as the ability to launch fireworks by moving along a ledge (see Launching from a ledge). Have a think about what you might be able to do.
Comments for particular locations
Here are some comments for various locations, listed in order of depth into the level. I'll add to this section as and when I get more experience with places.
Empty corner after the loading point
You're unlikely to want to have your firework fun right after the loading point, but I did some testing anyway to see how things go.
Let's say you leave an overturned Ghost in the empty corner area, aiming to get a pre-frozen Elite there. When you return later in your Banshee, you'll have a view of the still animated Elite before crossing the loading point, and you'll be able to see him freeze as you cross it. If you care to pepper him with plasma just before doing so, you can get his shield flickering and/or make him dodge about or crouch defensively. He'll freeze regardless and it can be fun to see what poses you can get (you'd want a handy checkpoint beforehand, for repeating things). Something I found interesting is that if he freezes while firing or just after, the illumination effect on the ground is frozen too (a bright patch), which seems to indicate that it's treated as part of his animation. If you go back over the loading point (it'll be at the end of that short section of tunnel in the direction you're now going), his animation resumes - something you'll need to bear in mind if you do want to set up a firework arrangement there. You can keep doing this freezing and unfreezing if you want to play around.
Covie corner after the loading point
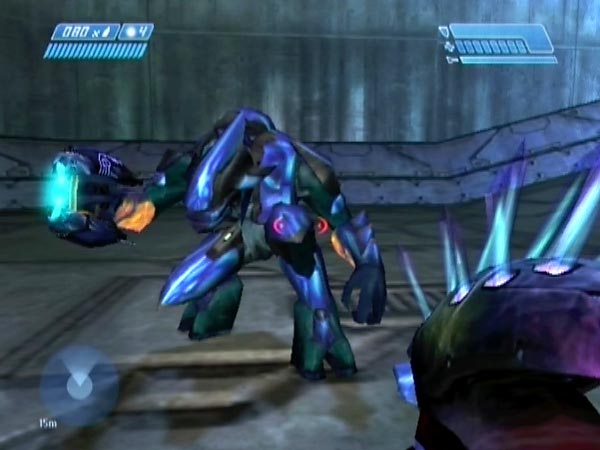
When I set things up for a pre-frozen Elite in the corner where you meet Grunts and Elites in the tunnel, he turned out to have a running pose, with a very strong anti-aim effect in the direction of his running. He was frozen in mid-stride a few metres from the Ghost as if heading for the bridge. That's him in the picture. First time I'd seen one of my pilots with such a pose. Further goes resulted in much the same thing, with the running frozen at various stages of the animation.
If you instead have an Elite a decent way up the tunnel however, you don't get these running poses; so there seems to be something special about that particular area. I'm not sure of the exact extent of this 'running zone' as you might call it, but I think it ends before the tunnel starts rising, and it includes at least part of the final hump in the passage. Talking of which, when I tried an overturned Ghost on the far side of that hump, I got an Elite frozen in a running pose in mid-air, like he'd spawned above the Ghost and had just started running. Looked pretty weird!
The main section of tunnel
One novel thing you can do with a firework in the final section of tunnel (i.e. from the covie corner up to the exit) is try to launch him up it, shooting him out of the exit.
The tower area
In the tower area where my original launch site was located, there seems to be a horizontal release plane across most of the area, something like 5 metres above the top of the first ledge. But as best I can tell, it extends only as far as the release line near the pass, shown in picture 10 of my release line guide. There also seems to be a second horizontal release plane way up in the mist, very near the ceiling. It's too high to be of any practical use so I didn't spend much time investigating, but I suspect it extends over the whole area.
If you care to have a firework inside the tower, it's possible to send him shooting up the hollow interior, and the needle effects will stand out brightly against the darkness.
Twin bridges area
The twin bridges area (with the two bridges overhead) makes quite an appealing place for fireworks I think. There's a release line going up almost its whole length, which is probably the line you'd use, but there's also a line at the exit door, not to mention the trough passages. There also seems to be a horizontal release plane over the entire area, something like 5 metres above the top of the first ledge. There are plenty of Grunts to trigger, which would probably give you at least a couple of full needlers.
As long as you've triggered enemies here (you might not have, if you skipped over earlier triggers), you could make use of the door checkpoint at some point, triggered by approaching the exit door (with Elites behind it). In particular it could be used for the pre-blasting technique (in which you do your blasting, trigger a checkpoint and keep it delayed until back at your Elites).
The long release line can be crossed at a point on the first ledge, right at the back, near a rather interesting feature. There's a big scoop in the cliff face, with a sloping base you can move about on. You could be on that slope when crossing the release line. The release line can also be crossed on the first ledge at a point near the start of the area, visible in picture 14 of my release line guide.
Using upright Ghosts
In this section I'll say a few things for the case where you're planning to use upright Ghosts (rather than using overturned ones in order to get pre-frozen Elites).
Ghost impeding and pilot ejection
Happily, you may not need to impede the Ghosts to prevent movement. If you place an upright Ghost anywhere beyond the narrow pass leading into the spiral path area, or even within the latter half of the pass itself (or thereabouts), the pilot doesn't seem to move from his spot when you return later in your Banshee. Apparently he lacks the necessary AI. He'll swivel and potentially fire, but that's all, making him a nice stationary target for ejection. So, that saves you a bit of set-up work. As for the ejection work, ideally you'll want to get a delayed checkpoint beforehand so you can make repeat attempts. If the dropship has been triggered, you can delay the associated checkpoint as usual.
If the Ghosts don't need to be impeded, that makes it easier to have them more separated than in my basic routine, and to eject the pilots separately. Done correctly and perhaps with a bit of luck, you could end up with the pilots reasonably close and facing the same direction, rather than facing somewhat away from one another - the usual result when placing a Banshee blast between them. Having Elites facing the same way is generally what I'd prefer.
Incidentally, stationary manned Ghosts can be pushed around with the Banshee if you want to move them for some reason. It's also possible to eject the pilot by flying into the Ghost, as an alternative to blasting. Flying into stationary Ghosts is quite good fun actually.
Triggering a dismount
Based on my testing, it seems that once you trigger the spiral path dropship (getting some music into the bargain), the Ghost pilots will dismount and become frozen in mid-air in a wide-legged posture while their Ghosts settle. I mention this as both an option and - if you don't want them like that - as a warning. I don't think it matters where a Ghost is. I've tried it with Ghosts in twin bridges area, the underpass, the spiral path area including the cliff path, and even the preceding tower area. I don't see any reason to go for this as an option though. The pilots seem to be rather high up, which is inconvenient for launching.
This dismount phenomenon doesn't mean you can't get the usual type of frozen ejected Elite in the twin bridges area or other well advanced places. You can, but you just need to do the ejection sometime before triggering that dropship. That's no problem. After the earlier dropship, briefly stay high to avoid triggering tower enemies, then continue on to the Ghosts to overturn them (you won't trigger any enemies there yet, because you skipped the tower trigger).