Exploring the entry chamber
Posted March 18th 2017, updated later
Associated movies
- BCM223 - Heroic; Set-up and tour (8:56)
- BCM224 - Heroic; Ring play (8:54)
- BCM225 - Heroic; Above the ceiling (8:53)
- BCM226 - Heroic; Ceiling pass-through, second method! (3:15)
- BCM227 - Heroic; Above the dome panels (6:24)
- BCM230 - Heroic; Barrier adventure (7:20)
- BCM242 - Heroic; Bottom of the chamber (8:30)
- BCM245 - Heroic; Hog descent quest (7:27)
- BCM246 - Heroic; Siege of Madrigal Easter egg (4:38)
- BCM248 - Bottom of the chamber, dead Grunts (6:29)
- Introduction
- Setting up with a checkpoint
- The dome and breaking glass
- Ring play
- Annular plain, column, barrier
- Siege of Madrigal Easter egg
- Getting above the dome
- Getting below the barrier
- Mysterious dead Grunts
- Specialized checkpoints
Note: some activities originally covered here have now been separated out into dedicated articles. See Force-launching and column ascent, Force-launching out into the void, and Plasma tennis in the ceiling room. I also now have a dedicated article on descending in a Ghost: Entry chamber Ghost descent.
Introduction
When you get hold of a Banshee, fly it back to the start of the first bridge, then squeeze it through to the vast chamber in which the Pelican dropped you off at the start of the level. You'll need to briefly dismount at doors to make them open; be careful not to get squashed in the confined areas.
It's a tight squeeze to get along passages, but once you get the knack of angling the Banshee appropriately, and especially the knack of entering the short sections (which may hold you up to begin with), you can get through to the chamber in about a minute.
Once at the chamber you can fly around and explore, and play. It's a remarkable place and there's also a load of fun you can have there. In this article I'll cover the exploration aspects (including the possibility of getting above the dome) plus some 'ring play'. More specialized recreations are now covered in separate articles, but I'll mention such activities as we go along, and link to the articles.
Earlier material
The earliest report of getting a Banshee to the chamber was apparently from Ohso in the HBO forum in December 2001, according to Samuel Huang who posted single-player screenshots two months later. Ohso mentioned glass breaking, some ring play, and the bouncy barrier.
Dark Helmet's 2002 video 'Fun in AOTCR' shows co-op fun in the chamber (including with a Warthog), and his June 2005 sequel 'More Fun in AOTCR' includes a bit of single-player fun on a ring. See here for both videos.
I think I saw at least one of those videos long ago, which led me to get a Banshee there myself and play around a bit - and write a very brief article. But now ten years later, I've explored far more and hugely expanded my written coverage, as well as making a load of movies.
Setting up with a checkpoint
Where can you get a Banshee? If you're using Heroic or Legendary, the earliest available is the one which attacks at the first bridge (it's absent on Normal and Easy), and you can grab that one. But if you don't want to do that, or if it's not an option, you could descend from the bridge and fetch the twin bridges Banshee. Or you could play through the game in standard fashion (no bridge descent needed) and steal the platform Banshee.
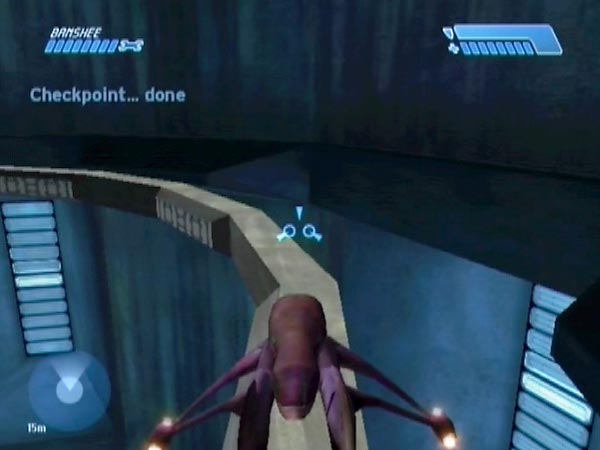
Regardless of which Banshee you bring to the chamber, it's highly advisable to get a delayed checkpoint there afterwards to serve as a starting point for playing around, which can be a hazardous business. If you grabbed the bridge Banshee you can use a checkpoint triggered on the bridge, as seen in BCM223. Very convenient. The same goes for the case where you descended from the bridge to get the twin bridges Banshee.
In the case of stealing the platform Banshee in standard play however, the bridge checkpoint won't be available any more, so you'll have to use some other checkpoint. The tunnel checkpoint can always be used. If using that one, it's nice if you've got a second Banshee, to enable you to fly back to the bridge after triggering the checkpoint (which you'd delay with Banshee fire). In particular this will save you having to pass through rooms and passages to reach the bridge. The concern there is with low ceilings (in places), which make checkpoint delaying by jumping problematic because the delay can easily get inadvertently ended, because your jumps were stunted. If you do need to get past a low ceiling, it seems safer to temporarily switch to another delaying method, such as throwing a plasma.
Prep checklist
Preferably be fully stocked with grenades when you get your checkpoint, because you can have fun with them. Also it's good to have full health, and flashlight fully charged. Prior to getting your checkpoint - and possibly prior even to getting the Banshee - you may like to assemble a stash of alternative weapons so you'll be able to choose what to play about with. Covie weapons can be obtained from the covies at the landing zone or in the first room. If you want a rocket launcher and sniper rifle, those are available later in the level of course.
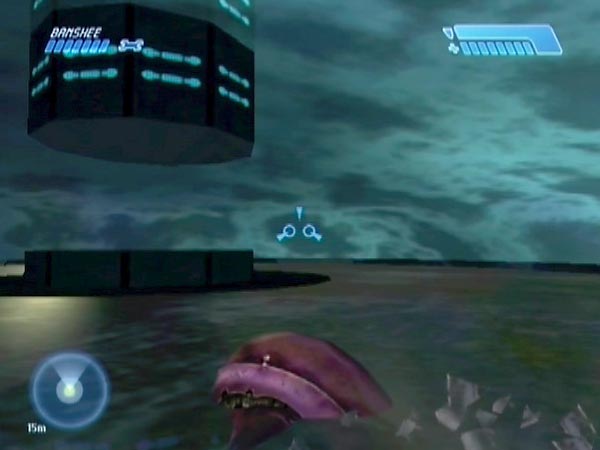
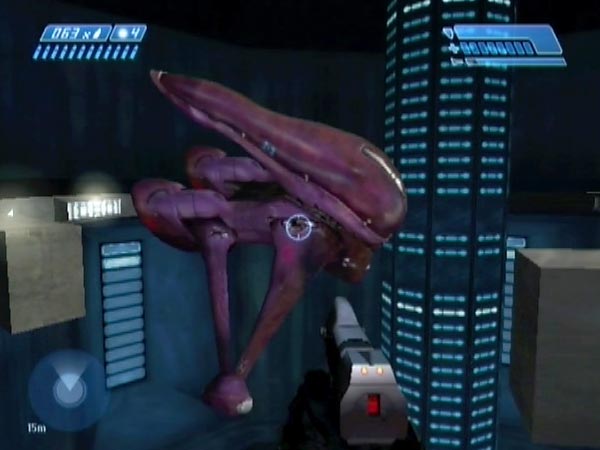
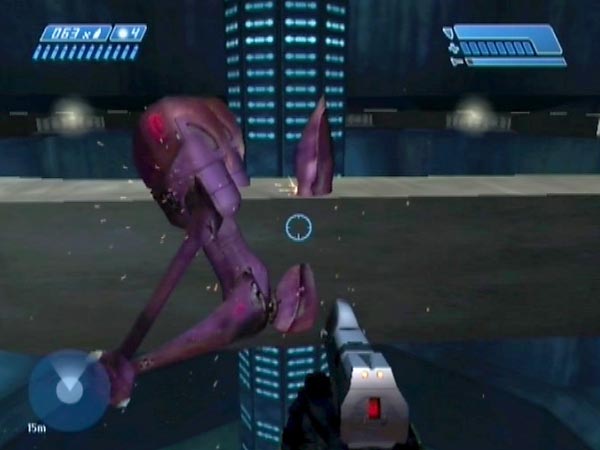
The dome and breaking glass
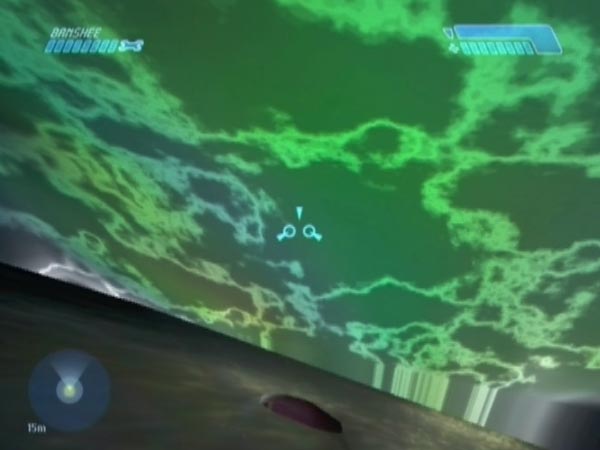
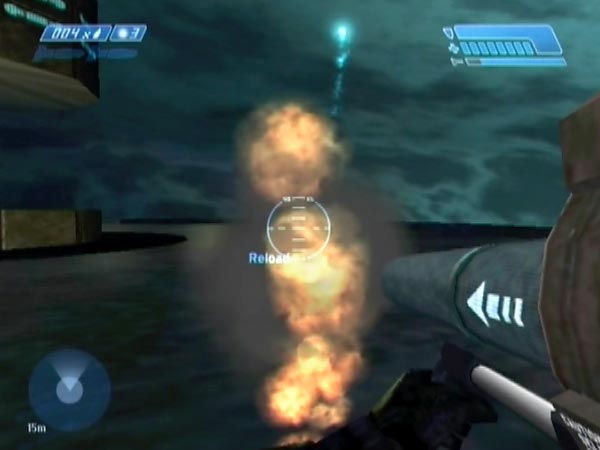
Among the things to explore are the translucent surfaces of the huge dome up above. There's the ceiling which is flat, plus enormous panels all around. And the great thing is, if you skim the Banshee along, you'll find that you cause a whole lot of breaking glass! If you make the right motions with the Banshee, you can get a good view of glass falling before it fades out - which it does quite quickly.
You can also get a view of what lies beyond the dome's surfaces. Namely, jazzy moving background patterns which exhibit different shades. I assume those are there to give things a shimmering appearance when seen in normal play. In particular there's some quite strong green, but in places you can see more of a bluish tone, and there's also some purple. The colouring varies around the ten panels, and in two places there's weird striated patterning at the bottom.
In further regard to glass breaking, you can vary your style depending on how you angle the Banshee. For example BCM223 shows an activity I call 'nosing'. That's when you've got the Banshee angled steeply upwards with the nose causing breaking glass as you move slowly forward, with the camera giving a nice view of the Banshee. It's a touchy business requiring fine control. If the Banshee isn't angled up enough you lose the camera view, but if it's angled up too far, forward motion stops and you also run the risk of falling out. Takes practice, but my movie includes a snippet in which the Banshee is moving steadily (I had the balance just right).
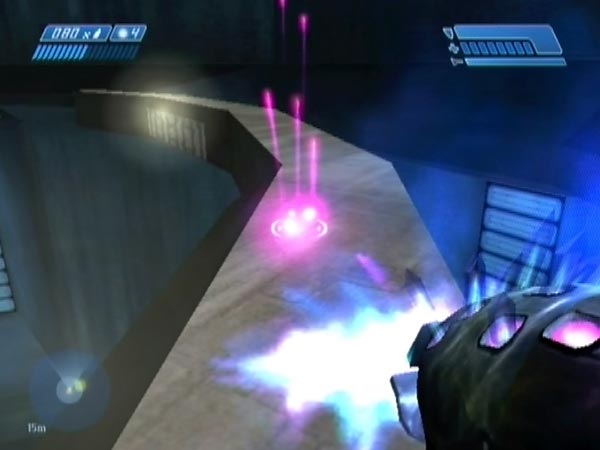
The movie also shows some light skimming, in which the Banshee is angled less aggressively than usual and doesn't break through the surface. There's also some aggressive plasma firing shown. But when using the fuel rod cannon while skimming along, you need to be angled right to avoid damage.
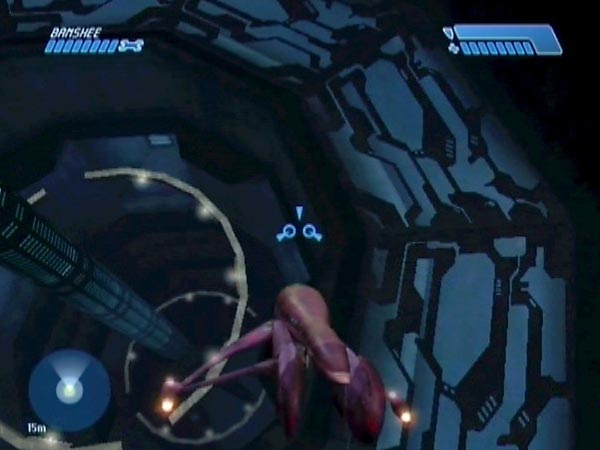
Ring play
There are three magically suspended broken rings that spin around the central column, and these provide excellent recreation as seen in my dedicated movie BCM224. Aside from the fun of blasting them with Banshee fire, it's possible to dismount onto a ring. Just rest the Banshee on the ring, aligned with it, and dismount before a gap gets close. I call it a 'resting' dismount. Easy and routine. Of course, you could also try stunt dismounts for fun.
Once on the ring, the surfaces slides underneath you and you can stay on by jumping as each gap comes up. Or alternatively you can do a crouch to get past a gap (it brings your feet up for extra clearance), though it needs better timing than a jump and you need to do it relatively late. Incidentally, crouching is good for situations where a gap is practically upon you or is already underneath you (perhaps you dismounted at a bad time or lost concentration for a moment). It can save you from falling.
You can run around the ring in either direction. Running with the spin ('downstream' rather than 'upstream') is harder of course, as you can't see gaps coming - unless running backwards that is. You can learn the right timing though; e.g. count how many footsteps to run for before doing a jump or crouch. An obvious challenge is to see if you can make a complete circuit.
When running upstream, on PAL Xbox you still need a jump or crouch at each gap, but on NTSC/PC you don't. The reason for the difference? MC runs faster and also the ring spins faster, so a gap is underneath you for less time than on PAL - and it's not enough time for you to fall into it too far. At the end of Dark Helmet's 'Fun in AOTCR' video (see link later), you can see him running across gaps. The ring rotation period looks to be about 6.7 seconds in that video, but on PAL it's 8 seconds.
When you dismount onto a ring the Banshee typically falls off, but I found that you can get it to 'settle', remaining in place even when a gap goes underneath. An amusing sight - and you can clamber onto the Banshee too. To get it settled, it helps if you've got it resting really centrally along the ring; otherwise it's more likely to fall off. Sometimes a Banshee settles at quite an angle, coming to a stop just before toppling off.
Dismounting onto a ring isn't the only way to get onto it. Around the edges are five ledges sticking out, which you can easily land on and dismount onto. From a ledge you can jump onto the ring. It's only just within range though; not an easy jump - and a mistake is likely to be fatal of course! Initially I thought I couldn't make it, but then I saw it done at the start of Dark Helmet's 'More Fun in AOTCR' movie, so I tried again and managed it. You can likewise jump the other way.
Something else to try: throw a plasma grenade onto the ring. Some plasma effects are swept around on the ring for a short distance, but the grenade potentially settles and the ring proceeds to slide underneath. Like a settled Banshee, a settled grenade will stay in place even when a gap passes underneath.
Embedding the Banshee in a ring
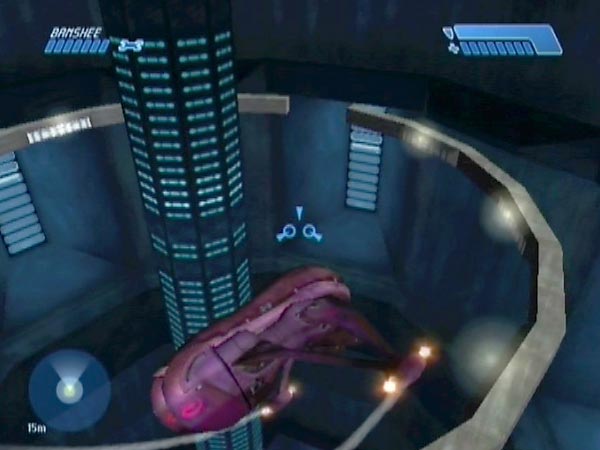
While playing around I hit on something which may be new, which provides some really weird sights - and for me it's the best ring fun of all (certainly the most interesting). Namely, you can get your Banshee embedded in a ring so it's supported (no flight input required), plus you can fly within a ring. In BCM224 I showed principally two types of stable embedding, though a third configuration is also briefly seen,
The first type - vertical embedding - is where the Banshee ends up steeply nose-down, almost vertical, facing either upstream or downstream. Start by resting the Banshee on the ring in normal fashion (as centrally as you can), then angle the nose down and seek to fly downwards. In short, push downwards. When a gap comes along the Banshee will fly down a bit, and the embedding begins. Keep pushing, and when the next gap comes, get further down. Hopefully that will complete the embedding and you'll find that the Banshee is supported. If so, you can release the controls and it'll just jiggle around in the ring, getting buffeted by the ring surfaces. Moreover you can dismount and watch it. And subsequently reboard and exit the ring! Sometimes the Banshee may work free, popping up out of the ring. Depends how well you got it embedded I think. If you got things just right, it can seem completely stable.
The second type - horizontal or aligned embedding - is where the Banshee ends up horizontal, aligned with the ring so the fuselage is more or less subsumed. It can be pointing in either direction, but achieving upstream embedding is easiest. The usual process is similar to achieving vertical embedding insofar as you angle down and make successive headway into the ring during gap phases. But instead of pushing down steeply the whole way, you need to ease things off to a shallower angle (you could start shallower too), and ultimately level out. Achieving downstream horizontal embedding is a bit harder, but it's a similar sort of process.
For upstream it's also possible to do a 'fast entry' in roughly horizontal attitude, by intercepting a ring-end appropriately. I showed two examples in BCM224, though the main one to aim for would be the first (seen in a picture here), where I'm approaching quite close along the ring. It's not easy though. The second, where I drop in steeply from above, is far harder and more like a freaky 'trick' entry rather than anything practical. It requires extremely fine timing to fall into the gap.
Once you're aligned in the ring, bear in mind that stability is quite sensitive to your angle. Ideally you want the top of the Banshee's canopy to be breaking the surface, either continuously or at least regularly. If the Banshee gets completely below the surface it becomes in danger of sinking through the bottom of the ring, ultimately falling out. So if you see that happening, angle up slightly to get back up.
With horizontal embedding you can't dismount to survey the situation (you'll fall), but on the plus side you can have the fun of flying the Banshee through the ring, maintaining the embedding. That's fun - and it's hard not to feel like a fish! You'll find that your firing goes a bit screwy; shots tend to fly off in unexpected directions. You can leave the ring when you want; it just takes a little struggling.
Annular plain, column, barrier
Here are some other readily accessible features, before I move on to trickier stuff.
Massive annular plain
Below the LZ (landing zone) there's a huge annular plain you can get out and walk on - or even drive on in a Warthog or Ghost if you bring one along. It's partly transparent and you can see flooring underneath.
Column
The column running up the centre of the chamber is not without interest. If you skim the roof of the Banshee against it so the camera gets a view inside, you'll see some odd sights. In the lower part of the column there's a four-sided inner column. It's strange that it should be four-sided (the column being ten-sided), and also that it fails to extend the whole length of the column. It starts around the height of the highest ring.
A further curiosity when looking into the column, is that for part of the length prior to the start of the inner column, you see just the topmost ring and nothing else. Just the ring against blackness.
Barrier
If you fly down the shaft, you'll find that you can't go below a certain depth. The Banshee gets stopped by a bouncy invisible barrier, around the height where some greenish mist starts. If you try to break though, you simply get sprung back up, courtesy of (seemingly) an upwards force which acts on your Banshee whenever it's below the barrier height. The Banshee can rest on the barrier; but if you dismount, you'll fall to your death and the Banshee will fall too. It was only being held up because you were in it.
The presence of this barrier suggests to me that Bungie anticipated that you might be flying around in the chamber. Did they envision you squeezing a Banshee back through the passages to reach the chamber? Perhaps. But another theory is that when they were working on the chamber, the level design wasn't yet finalised, so they played safe by allowing for the possibility of having a Banshee there.
UPDATE, 31/1/21: I've now recalled something. At some point Bungie must have had a Banshee at the LZ, because I once had a (very bad) Prima strategy guide which said: "Cover the door immediately and stop the Elite getting to the Banshee; it'll make your life easier." Evidently they were using some pre-release version of the game. Assuming the Banshee was flyable like all others in the level, this would account for the barrier, and for why the chamber is so detailed so far down. Why was the Banshee cut? Here's one theory. Maybe someone realized you could squeeze it through the passages to reach the bridge with it, which would then totally mess up how the level was intended to be played. But tweaking the level so you couldn't squeeze it through may've been judged too much trouble, so they just cut the Banshee instead.
Siege of Madrigal Easter egg
Intriguingly, there's a musical Easter egg available if you stand at a certain place, accessible via Banshee. If you want to have the fun of trying to find it for yourself, read no further!
Okay, are you still here? In that case I'll reveal the location. It's down at the barrier, along a ledge, as seen in BCM246. Actually you don't have to be standing, though that's certainly the most convenient. You can hear the music even if you're still aboard your Banshee, if you angle it right.
It's also possible to reach the location after reboarding the Pelican at the start of the level and riding it down to a nearby spot: see BCM247 and my related article.
History
This Easter egg seems to've first been mentioned by SHARKZ in the HBO forum, in February 2002. Or at any rate, that's the earliest mention listed on HBO's Easter eggs page. A Banshee was used.
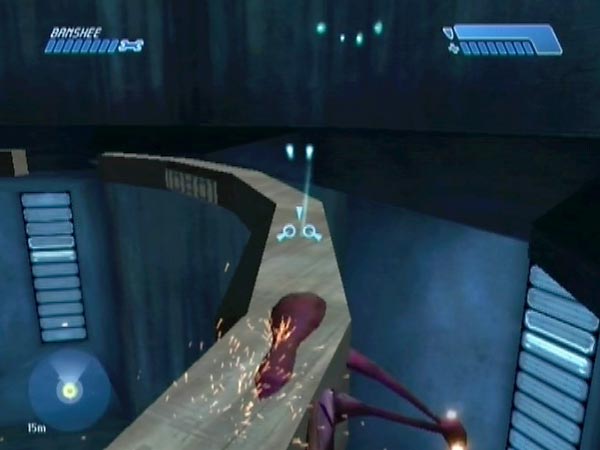
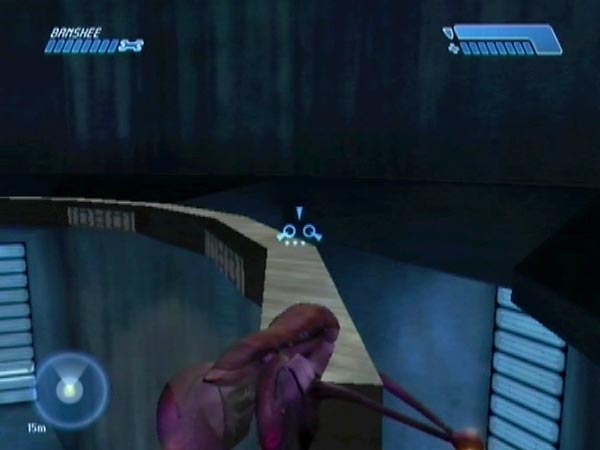
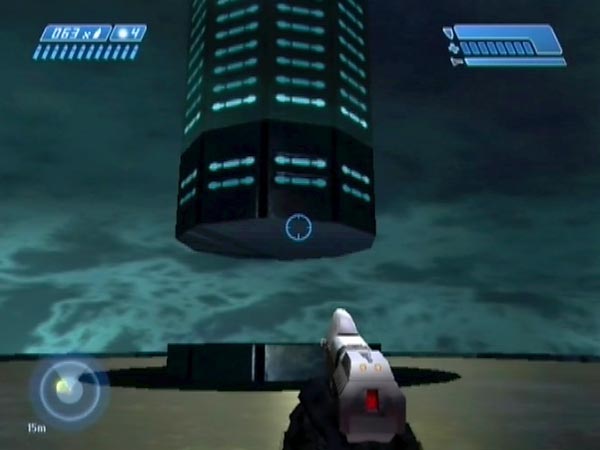
Getting above the dome
When fooling around I discovered a way of getting through the glass to end up standing on the flat ring-shaped ceiling, in an interesting room. I believe that was a first for single-player (I'm not sure about co-op, but I haven't seen anyone there).
Into the ceiling room
How is it done? In the vicinity of the ceiling are various protuberances: the big dark 'collar' around the column, and the 'runners' separating the ten glass panels around the side of the dome. If you fly up vertically and hit a protuberance in order to get jolted out near the glass, you can end up going through. Bumped through by the Banshee I think. Sometimes you end up with considerable speed, sending you into blackness above the shimmer layer - in which case the fall can kill you!
Getting through may take a bunch of tries, especially if you're new at it, so for maximum convenience get a delayed checkpoint up high, ready to make a vertical approach. Then you'll be able to do retries fast. That said, it can become pretty easy when you've honed your technique. Using the collar I've been able to get a 70% success rate measured over 50 tries from a convenient high checkpoint. Basically you scrape the nose of the Banshee against the collar (you don't even have to be going at top speed). You'll see the specific technique highlighted in BCM225, my movie about the whole business.
I subsequently also found a 'soft hit' method, shown in BCM226. It has a lower success rate than the jolt method, but is quite interesting and amusing.
Note: If you fly up vertically and get jolted out by the ceiling itself, that won't get you through. Or at any rate, it never worked for me despite many tries. I also tried dismounting just before reaching the ceiling. No good.
Once you're in the room, you can explore. It has invisible walls all around the 20-sided periphery (extending well past the top of the column), and plasma fire is useful for briefly revealing them. The column has a break in it, and the two cross-sections feature strange patterning. The lower one can support you, yet grenades and fired ordnance pass through (the lower sides likewise exhibit pass-through). Looking up, you can see where the shimmering intersects the column.
There's also some rather engaging sport you can have in this room. See my separate article Plasma tennis in the ceiling room (formed from material originally covered here but then separated out).
Onto a panel
This jolt technique can be used also to get on top of a panel, though in that case you'd only use a runner, not the collar. Moreover you should use the side of a runner, along the topmost section of the panel, as demonstrated in BCM227. Hitting the end of a runner can get you onto a panel, but it's not the best choice.
You can also use the soft hit method for getting onto a panel; and there's a 'hard hit' method too. Both methods are included in BCM227.
As for what things are like on a panel, again you're hemmed in by invisible walls. The topmost wall angles back quite sharply though, making it also a ceiling. Only the topmost section of the panel gives you traction. Once you venture onto the next section, you'll slide down and die while falling, before settling on mysterious invisible surfacing in darkness.
Old co-op exploits
In co-op some folk have got above the dome, though not necessarily into the ceiling room. I know of FrogBlast's 2002 co-op videos, two co-op 'outside of level' videos from Ms. Man, and also a 2012 co-op video from Halomen3000 advertising an apparently new method.
Getting below the barrier
Is there any way to get to some place below the barrier? Yes! You can even reach the bottom of the chamber!
My first experience with this was shown in BCM230, where I at least managed to reach an alcove below the barrier, by having a Shade there to cushion my fall from a platform (though I later found that a Banshee provides better cushioning).
Later however, 3rdPerson alerted me to his 2006 video showing how you can actually reach the bottom of the chamber by using a Ghost for the lowermost part of the descent. Great! I hadn't known about that, but soon explored it. See BCM242 for a tutorial based on his method. It includes a new safer option at the end, dropping to an alcove rather than driving at the column.
Shortly afterwards I found an easier type of 'platform drop' which likewise helped, but more importantly it gave rise to a new method of getting down. Thanks to the relative ease of the new platform drop, it was now viable do the whole journey in a Ghost, from the LZ down to the bottom! Such Ghost descents are a lot of fun and highly recommended. See my new dedicated article Entry chamber Ghost descent. You can also see BCM243 for a demo, and BCM244 for some speed runs.
Later I investigated whether you can also drive down in a Warthog. See BCM245 for how that went.
Force-launching
The great thing about being able to get below the barrier is that you can enjoy what I call 'force-launching', in which the barrier force is used to launch you upwards in a Banshee at impressive speed. I got my first taste of that in BCM230, at the end. It's something you can use to ascend to the top of the column, and also to break out into the void. For these major topics see my separate articles Force-launching and column ascent and Force-launching out into the void (material previously covered on this page, but later separated out).
Old material
I've already mentioned 3rdPerson's 2006 video on reaching the bottom. In connection with that, there was also another HIH thread plus an HBO news item. There were some co-op exploits earlier; e.g. see this and this from FrogBlast.
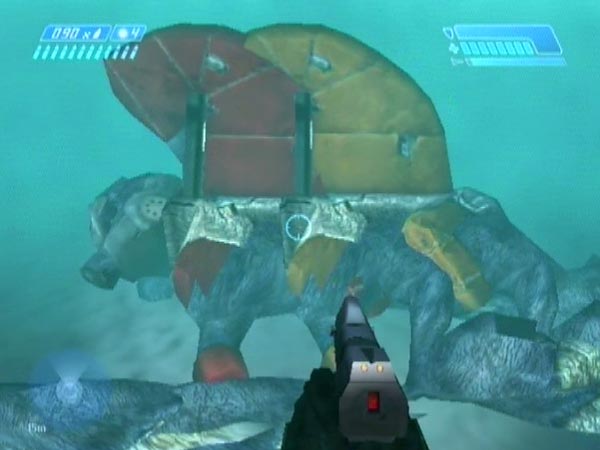
Mysterious dead Grunts
At the bottom of the chamber you can potentially find three dead Grunts in the mist, and nearby some plasma pistols and plasma grenades. Mysterious! I did some investigation which involved setting things up ten times from scratch (three times on Heroic and Legendary, twice on Normal and Easy), to see what things looked like, and you can see some results in BCM248.
The Grunts can vary in type, but their layout seems to always be the same - and in particular they're in the same location, not far from one of the chamber walls. A key feature is that two of the Grunts are bodily coincident, fully overlapping. If both of them have the same design, they can thus appear to be just one Grunt; but they're easily separated by tagging with a plasma grenade. The third Grunt partly overlaps the coincident pair. He's a short way behind them, facing the same way.
My ten set-ups gave the following Grunt configurations. It broke down according to difficulty level. On Heroic, the coincident Grunts were both red curl-backs (thus appearing as a single red curl-back), and the other was an orange curl-back. On Normal and Easy, the coincident Grunts were a red fin-back and and an orange curl-back, and the other was an orange curl-back. On Legendary the coincident Grunts were a red curl-back and orange curl-back (appearing as a jazzy curl-back), and the other was a red curl-back. I can't be sure that you always get these combinations (according to difficulty level), but that's my suspicion.
Weaponry layouts can vary a bit. Plasma grenades may be absent despite the presence of the pistols.
Finding the Grunts - if they're present
You can't see far in the mist, so how do you find the Grunts? I suggest that you follow the wall until you spot the plasma pistols (the Grunts are much harder to see). Going clockwise, it'll be the wall where you're heading north. If you have an AR, you can make use of the compass, and an option is to head west from the column.
However, bear in mind that the game can clear stuff away, just like with other bodies and dropped weaponry. So there might be nothing there (which was the case when I first reached the bottom), or the scene may be incomplete. My advice for avoiding that, is to preferably avoid triggering the two-Wraith area. That may be a key time when the game is liable to do some clearing of earlier areas.
Why are they there?
As for whether the Grunts are some sort of Easter egg, they weren't admitted into HBO's Easter egg list, and some people think the Grunts are some sort of junk - e.g. akin to the lone Marine you can find on top of 343 Guilty Spark.
A Halopedia page says "If one looks at the relevant scripts in HEK (Halo Editing Kit), one will see that these Grunts are the same ones that appear in the beginning cutscene: They are killed and teleported down there." But I question that, because it's counter to observation. For example, on Easy and Normal one of the dead Grunts is (or can be) a fin-backed red, yet there are none in the cutscene (which in any case features five Grunts, not three). Also, on Heroic and Legendary two of the dead Grunts are (or can be) curl-backed reds, yet the cutscene has only one.
Early mentions
I'm not sure when the Grunts were first mentioned by anyone, but there are threads in the HBO forum here and here (both October 2003), and here (July 2004). There's also the Halopedia page I mentioned - and a duplicate here.
Specialized checkpoints
When I spoke about getting a checkpoint in the chamber, I showed a picture of getting one on the platform, standing near the Banshee and some gathered weapons. That's a generic sort of checkpoint, but there's nothing to stop you getting a specialized checkpoint oriented around a particular activity (and remember, checkpoint delay can be continued with Banshee fire). For example, one obtained near a ring (e.g. ready to dismount) would be ideal for doing ring play, because each time you revert or get reverted, you'll be right back on the scene.
Bear in mind, you can even get a checkpoint in the ceiling room or on a dome panel. For doing this, I recommend causing the final checkpoint delay with a fuel rod shot, fired downwards so it goes into slo-mo and eventually hits the annular plain. That gives you a good amount of time to make an attempt at getting through the dome.
If you initially saved a generic checkpoint, but then fancy a specialized session of play, you can head back out of the chamber and bring back a new delayed checkpoint to form a temporary specialized one. In the case where your generic checkpoint was the bridge checkpoint (as used in BCM223), the next one you could trigger is the post-bridge checkpoint, in the short second section of the passage after the bridge. Very convenient.