Playing 'Shark' at the first bridge
Posted September 24th 2006, major revision January 2019
Associated movies
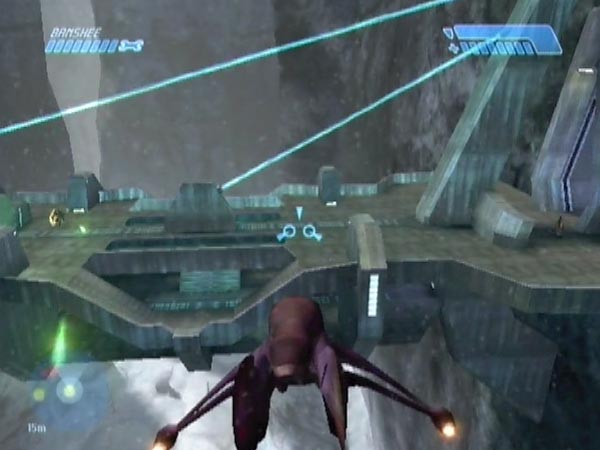
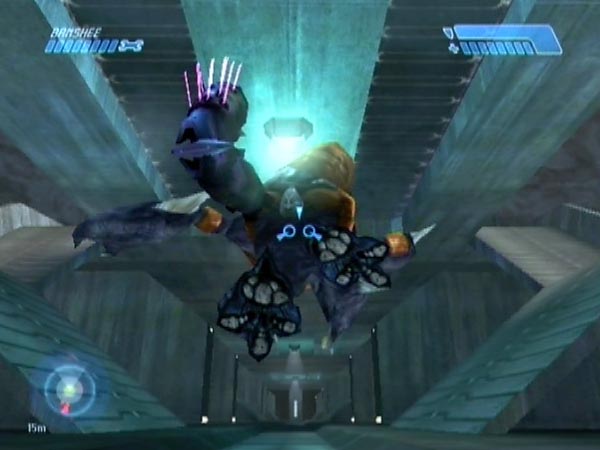
If you've got a Banshee and the first bridge is well populated with covies, you can have a lot of fun skimming along underneath to make them dive off the lower deck, and then potentially blasting or splattering them as they fall. Your view is actually above the deck as you skim along, so you can see the covies coming up. It's an activity I call 'Shark', as it's reminiscent of a menacing shark cruising just below the surface. There's also a variation of this in which you get the Banshee 'clipped' into the deck so it's actually suspended by the canopy, providing yet more fun.
Setting up
There are various ways you can set things up, with a handy checkpoint from which to play repeatedly. The most direct way is to use a Banshee grab as shown in BCM329, though you'll need to be using Heroic or Legendary because there's no Banshee otherwise. Grab it, trigger a second batch of bridge troops with a low pass across the middle area of the upper deck, then trigger a third batch with a low pass nearer the end. You've now got all the bridge troops. A checkpoint is triggered along with the last batch (the bridge checkpoint) but is initially delayed by enemy threat. Back off to get it (e.g. sink down to somewhere near the height of the lower ledge), and you're ready to start the fun.
One set-up detail to add though: preferably get rid of the Shades before they get manned. That way, all Grunts will remain on foot, to be potential victims in the Shark play. The first two Shades can be grenaded off the bridge before you do the grab. The other two should be blasted off before triggering the second batch of covies, which includes two Grunts behind the wall at the far end (see pic, left).
An alternative set-up method is to do a descent trick at the bridge, go off to get the twin bridges Banshee (from the much later area with twin bridges overhead), bring it back, then finish off like in the previous method (assuming you haven't triggered the second and third batches of bridge troops yet).
Yet another method is to cross the bridge, bypassing the covies (and making sure the gold Elite doesn't follow you inside at the far end), then go on to steal the platform Banshee. You can then trigger and delay a checkpoint, then fly back to the bridge and get it. One such checkpoint you could delay is the 'tunnel checkpoint' which gets triggered in the tunnel that leads to the underground bridge. Music gets triggered just before, and perhaps you'll like having that music during your Shark play. But there's also an earlier checkpoint trigger out in the snow, a short way past the Wraith (if you're sufficiently low down).
However you set things up, preferably avoid Banshee damage so it'll be as resilient as possible in the forthcoming fun. Also, I suggest using Heroic or Legendary because on Normal and Easy you get fewer bridge troops. Specifically, the final batch contains only a gold Elite; no minors.
Basics of the fun
The basic technique is to fly along beneath the lower deck, with the canopy rubbing against it. If you angle up you can get the camera low, which looks dramatic, but it also reduces your speed (there are a few more details on this 'low camera style' later). You can also cause dives by ascending towards the deck. And actually, ramming up into the lower deck can splatter covies, which can be pretty amusing.
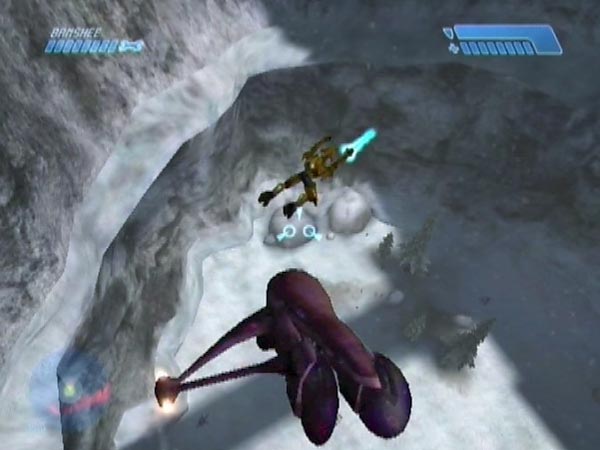
There's no trouble getting Grunts and Elites to dive off, but it's harder with Jackals because their dives are very short. They need to be relatively near the edge to go off. But if a Jackal doesn't quite go off, you can always double back for another try while he's near the edge.
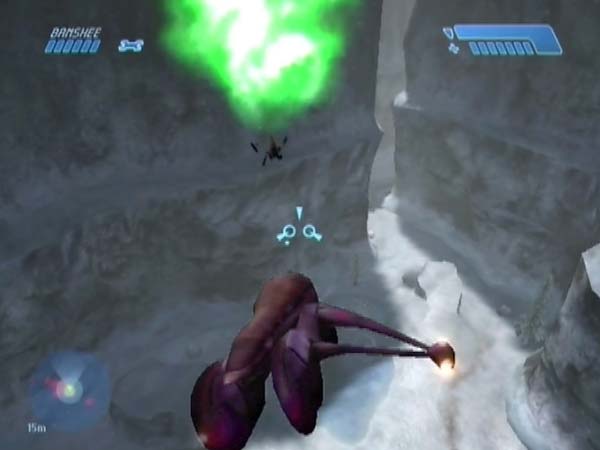
Once you see that a covie is going off the edge, it's fun to try and score a fuel rod hit in mid-air. Indeed, Shark is rather special for giving you the potential of falling targets like that. Hits are quite challenging though, as you'll see. One tactic is to aggressively fly after him or (with some covie trajectories) to intercept him, but another is to just cut the power and concentrate on your shot.
A fuel rod hit will kill a Grunt or Jackal, but Elites are tougher and potentially need weakening with plasma fire first (on Heroic and Legendary at least). However, you don't have long to do that, if you want to get in the kill shot before he dies from falling.
Another possibility with a falling covie is to splatter him, but that's not easy either. Typically you'll need to be going after him very promptly, else you won't reach him in time.
Many of the covies tend to mostly remain on the top deck, but you can potentially bring some down (at least temporarily) by breaking glass panels when covies are standing on them. A fuel rod shot to the bottom of the lower deck is enough to do that. You can even do it while skimming along; and if you angle the shot right, it's possible to avoid Banshee damage (there's an example in BCM329 around 2:12).
More about dives
When Grunts and Elites dive off they can go a very long way. Grunts have some interesting aspects in that regard, all of which can be seen in BCM329. There's a shallow depression down the middle of the deck, and if a Grunt dives when near one of the sloping sides, the slope can deflect him up, giving a higher trajectory than normal, and greater distance. He can potentially reach the rocks behind the Marines, if heading that way.
There are also two ways a Grunt can launch off a ramp. Firstly, if he's on the deck and dives towards a ramp, it can deflect him up amusingly.
The second way is when he's already on a ramp but near the bottom. When you fly down the middle of the deck, he'll start to dive down onto the deck, but it hurts him, which I assume is due to his speed (diving off a slope can actually kill a Grunt like that; I may do a movie on that sometime). There's an animation of back pain which cancels the dive animation (which was barely getting started). He's still moving fast though, and slides up the opposite ramp, usually leaving at high speed. Overall, it looks like he spontaneously slides across on his feet (often sideways), which looks weird and highly amusing. I call it a 'ramp slide', and it's quite common.
More about low camera style
I already mentioned that if you angle up to get the camera low, it reduces your speed. There are a few other differences too.
Firstly, you can get closer to covies before they get spooked and dive. Secondly, if they don't dive clear they sometimes get splattered - presumably because the Banshee is sticking up more. And thirdly, it's possibly to about-turn while staying in contact with the deck and retaining your above-deck view. Basically you need to swing around in a tight curve; that's the best I can describe it. There's a bit of a knack to it though, so it'll probably take some practice.
You can shatter glass while using low camera style (there's an example in BCM329 around 4:44), but the Banshee will take damage.
Clip style for yet more fun
After making BCM292 in mid 2018, I realised that if you fly your Banshee at the lower deck with the top of the canopy just above the height of the deck's surface, the Banshee can 'clip' into the deck and will then be suspended at that height (like the enemy Banshee was, in that movie). It's easy. You can then skim it along and make covies dive - so it provides another way to play Shark. A key difference is, the Banshee won't sink if you let off the power. That lets you dawdle and do small motions to cause dives and have other fun while retaining your above-deck view, such as seen in BCM330. In fact it's an extremely good situation for toying with covies.
You can angle down to fire on falling covies while clipped in, but the targeting is a bit glitchy. Which is to say, the shot direction sometimes differs wildly from your aim. In particular, a fuel rod shot might immediately hit the bottom of the lower deck, causing Banshee damage or destruction. An alternative attack method is to fly out of the deck to pursue the covie freely, but exiting the deck is sometimes a bit slow. For the business of blasting covies in mid-air then, I'd say it's better to be playing Shark in normal fashion, not using clip style. On the plus side, covies are easily splattered as you move along the deck.
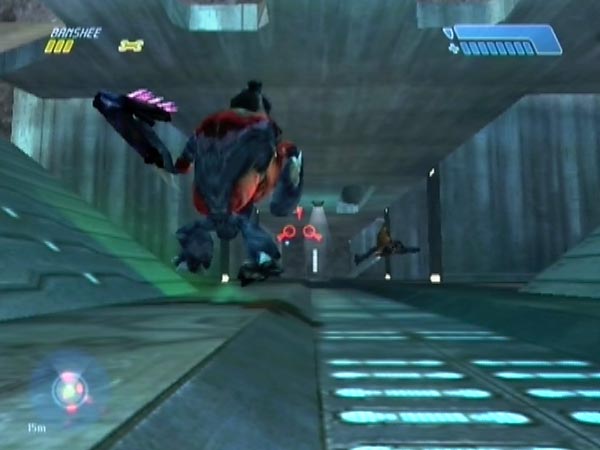
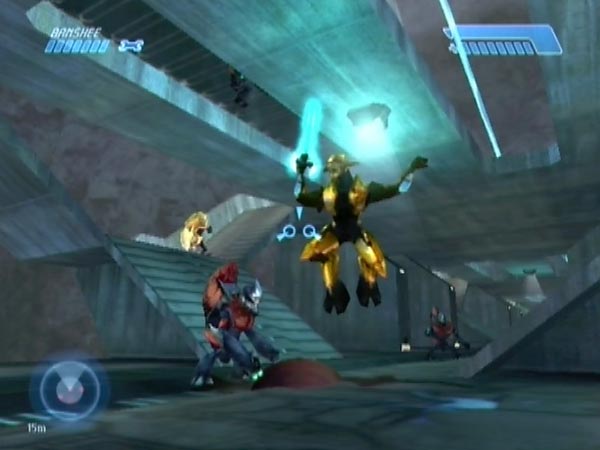
A small patch of the Banshee's canopy is usually visible above the deck, but the covies don't normally fire at you. The only time they might fire is when you angle the Banshee up very steeply, but you have no call for doing that. The gold Elite invariably does target you though. He swings his sword wildly, frequently killing compatriots in the process (see pic), but leaving the Banshee undamaged. This makes for some excellent fun. See how many covies you can get killed like that! Or, try to get him to kill the other Elite - a challenge illustrated in BCM331.
Another activity you can enjoy is to try and get underneath a covie to lift him up a bit. When lifted like that, a covie will often rotate. Sometimes he might start 'twitching', rapidly switching back and forth between two animation frames. That seems fairly rare though.
Optional battle raging below
With extra work it's possible to set things up so there's also a battle raging below, adding more atmosphere and fun if you want it. You can adapt either of the first two set-up methods to include this. Here's what you'd do after all the bridge troops have been triggered.
Park your Banshee by the door beneath the bridge. Go inside to the lift, bring it down and ride up, then go through the room and into the passage beyond, triggering enemies in the room you just came through. Turn around and resume normal play, heading back down.
In the passage that leads out into the snow, a checkpoint will be triggered halfway along the short second section. One option is to get it before the loading point as normal. Another option - more convenient from the viewpoint of subsequent play - is to keep the checkpoint delayed until airborne. However, getting the checkpoint may be problematic because of ongoing combat. In particular, it'll stay delayed while there are Wraith shots flying though the air.
Other bridges
After I advertised the original version of this article in the HBO forum, fellow cyborg hminn replied and alluded to the fact that you can also play Shark at the twin bridges later in the level. Quite right, although it's harder to make the camera cruise along smoothly, and the side barriers make it harder to get enemies to leap off (but at least there are lots of them!). For that matter, there's the underground bridge to try as well, and you can even have a bit of fun with the rock bridge in the final part of the level. Check out my reply to hminn for a report on all this.